a
SOLIDISK
TECHNOLOGY LIMITED
COMPUTERS PERIPHERALS MICROPROCESSOR
DEDICATED SYSTEMS
Tel: (0702)354674 Trade Name: AUDIO
COMPUTERS
17 Sweyne Avenue, Southend-on-Sea, Essex
SS2 6J0
SOLIDISK SIDEWAYS RAM
SEPTEMBER 1st, 1986
(Revised version of the green JULY 1984
Manual)
PLEASE READ THIS MANUAL THOROUGHLY BEFORE
YOU
RING US UP!
SOLIDISK BBC SIDEWAYS
RAM
CONTENTS
Chapter 1: System Overview
1.1
Preliminary
1.2 Compatibility
with other devices
1.3 Upgrading
to Double Density
1.4 What
happens if you don’t have disks?
1.5 How
does the Sideways RAM work?
1.6 Uses
of Sideways RAM
1.7 Free
software from Solidisk
Chapter 2: System Installation
2.1 Check
the Utility Disk
2.2 Check
the Base unit
2.3 Check
the Mini Cartridge
2.4 Check
the RAM card
2.5 Remove
the top case
2.6 Install
the Base unit
2.7 Use
the Mini Cartridge
2.8 Connect
the control wires
2.9 Install
the RAM card
2.10 Test
the Sideways RAM
2.11 Replace
the top case
Chapter 3: Specially Written
Programs
Turn
over for full details
Chapter 4: Solidisk Local Expert
Network
4.1 Getting
to know your local expert
4.2 Bimonthly
Newsletter
4.3 Please
write to us
Acknowledgements
Diagrams
Contents—continued
Chapter: Specially
Written Programs
Vol.
1 3.1.1 The MENU program
3.1.2 The Printer program
3.1.3 The INDEX program
3.1.4 The STLOEOO program
3.1.5 The STL150 program
3.1.6 The STLDISC program
3.1.7 The Word64 program
3.1.8 The Keyboard program
3.1.9 The FBACKUP program
3.1.10 The QUICKCOPY program
Vol.
2 3.2.1 The Silexicon program
3.2.2 The
STLRFS program
3.2.3 The RUTILS program
3.2.4 The SWRDMA program
Vol.
3 3.3.1 Macro Basic
3.3.2 Virtual Memory Processor (VMP)
3.3.3 VMP Application: Stock Control
Vol.
4 3.4.1 Solidisc Datafile
Vols.
5 to 7 The SILEXICON package
Vol.
5 3.5.1 The SIGEN dictionary generator
Vol.
6 3.6.1 The French Dictionary’.
Vol.
7 3.7.1 The German Dictionary
Vol.
8 3.8.1 The Solimon program
3.8.2 The
65C02 Assembler
3.8.3 The
Solitrace program
3.8.4 The
UVIPROM program
3.8.5 The
SPRITE program
3.8.6 The SPRITE
DEFINE program
Vols.
11 to 15 Megagames
Chapter
1: System Overview
HOW IT FITS, HOW IT WORKS AND WHAT IT
DOES
1.1 PRELIMINARY
The
Sideways RAM system consists of:
- A cartridge base which provides easy access to the computer
address, data and control
buses
- A mini ROM cartridge which accommodates and protects any ROM
from being damaged through
handling
- A sideways Ram card which conveniently replaces any
ROM
- A Solodisk Extension card which is basically more Sideways
Rams
(optional)
- A SWR system disc which contains utility programs such as
MENU, STL150, SILEX, INDEX, PRINTER, STLOEOO,
etc.
(The
supplied disc is formatted as single density, 40 tracks or 8o tracks to
Acorn’s DFS specifications)
1.2 COMPATIBILITY
WITH OTHER DEVICES
1.2.1 COMPATIBILITY
WITH ACORN COMPUTERS ADD-ONS:
Solidisk
hardware is completely compatible with all add-ons produced by Acorn Computers
for the BBC micro, including Teletext Adaptor, Econet IEEE Interface Controller,
6502 Second Processor, Z80 Second Processor, Joystick and Ink Jet
Printer.
On
the Software side the BBC micro fitted with Sideways RAM will run ALL
commercially available software from Acornsoft and other main
producers.
Depending
on your DFS, it will also run all or MOST of the Specially Written
Programs.
Some
Specially Written Programs (as detailed in Chapter 3) require a standard DISK
INTERFACE.
1.2.2 STANDARD
DISC INTERFACE
The
standard disk interface is the SINGLE DENSITY DFS based on the INTEL 8271 Disk
controller.
This
system is the ONLY official one. It can be supplied by Acorn, Watford
Electronics, Pace, Cumana, Viglen, etc. They are all the same EXCEPT for the
Disk Filing System EPROM (DFS), which for reasons of copyright cannot be the
same as Acorn’s own products. Here are some Single Density DFSs: Acorn
version .90, .98, .9a, .9f, .9v, DNFS (as supplied with the Second Processors),
DFS1.3 (Watfs), C.U.C. DOS and AMCOM.
1.2.3 DUAL
DENSITY DISK INTERFACE:
This
system is NOT official. The dual density disk interface allows you to select
either single density or double density to store your software on to disk.
Double density means that you can store twice as much data and programs on to
the same diskette. In single density mode it allows you to run all commercial
software diskettes.
THE
DUAL DENSITY DISK INTERFACE IS NOT
COMPATIBLE
WITH SOME IMPORTANT SPECIALLY
WRITTEN
PROGRAMS
These
are:
- THE STLOEOO STL150, STLDISC and
VMP1.2
Some
dual density disk interfaces are: LVL, OPUS, MICROWARE, KENDA
Note
1.2.1:
The
following systems are NOT AT ALL COMPATIBLE and there will be NO FIX in the near
future:
- KENDA PROFESSIONAL DFS
- THE HOBBIT
- THE FLOOPY SYSTEM
- THE WATFORD’S
APEX
The
reason is hardware related.
Note
1.2.3:
Solidisk
Double Density DFS (DDFS 1.40) is compatible with ALL specially written
programs.
The
Solidisk Software Support Service will provide utilities to use diskettes made
with Acorn’s Double Density Disk Interface for the Electron and the ABC
series.
1.2.4 THE
6502 SECOND PROCESSOR:
The
6502 Second Processor comes with two new Sideways ROMs:
the
DNFS and the High BASIC. The DNFS will replace the old DFS ROM and the High
Basic the old Basic ROM.
SET
UP YOUR SIDEWAYS FIRMWARE (SEE SECTION 3.!)
THEN
SWITCH ON THE SECOND PROCESSOR. HOLD
THE
CONTROL KEY DOWN WHILE PRESSING THE
BREAK
KEY.
STLOEOO
and STL50 will not operate with the Second Processor.
1.2.5 THE
Z80 SECOND PROCESSOR
The
Z80 Second Processor is quite a different animal; it will not run any of the
existing software except Basic programs.
None
of the specially written programs will run on the Z80 processor. Solidisk
Software Support Service will provide the RAM disk facility to Z80 users in
November.
1.2.6 THE
SIDEWAYS RAM IS NOT COMPATIBLE WITH ANY SIDEWAYS ROM EXTENSION
BOARDS:
It
will be explained later, in section 1.5.2,
why Sideways RAM is not compatible with any Sideways
ROM extension board, including boards made by Watford Electronics, SIR, APTL and
Romex.
Note
1.2.6:
Solidisk
have produced a combined CPU booster, DMA chip for Hard Disk add-on, HIMEM at
&8000 capability and up to five extra Sideways ROM sockets (plus three on
the BBC board).
1.2.7 THE
MACE JOYSTICK AND OTHER INSTRUMENTS CONNECTED TO THE USER
PORT:
Devices
making use of the user port are not compatible with Solidisk’s 32K system
or larger. It is possible to switch off (and/or disconnect) the external
devices, set all Sideways Software as per section 3.1, then reconnect or switch
on the external device. It must be pointed out that the RAM disk facility will
not work with any external devices connected to the user port.
Notes
1.2.7:
Solidisk’s
own Double Density DFS has an auxiliary port which can be used by Sideways RAM
in place of the user port but there is still work to be done on the software
side.
1.2.8 WRITE
PROTECT THE SIDEWAYS RAM CONTENTS:
You
should not write protect the Sideways RAM as all specially written programs will
not work..
Unfortunately
certain Sideways ROMs such as Starbase, PRINTMASTER, etc., write into Sideways
RAM to stop you using them in disk form. The trouble is they tend to corrupt
other programs in Sideways RAM bank F.
The
solution is either to use a bigger Sideways RAM (SWR32 or larger) and leave bank
F unused when any of these ROMs are in your machine (in ROM or RAM) or
alternatively install a write protect switch.
1.2.9 IF
YOU SWITCH OFF THE COMPUTER COUNT UP TO TEN BEFORE YOU SWITCH ON
AGAIN
This
is to destroy the contents of Sideways RAM before the machine is powered. Always
unlock the disk drive door if the machine is left unattended.
Count
to 20 if your machine has the old
black linear PSU (they were fitted on BBC issues 1 and 2 only).
- UPGRADING TO DOUBLE DENSITY
DISKS:
If
you consider upgrading your present DFS to Double Density or Super Mini (8in.
look-alike), the DFDC (Dual Floppy Disc Controller) solution is your first
choice. This is the only way you can get 100% compatibility with the new
Acornsoft software on disk. New games such as Elite will not run on any other
FDC than the 8271. It is also worth noting that serious software such as Scribe,
Starbase, etc., do not exploit the extra storage provided by the double density
format.
1.4 WHAT
HAPPENS IF YOU DO NOT HAVE DISKS?
Solidisk
can supply you with the STLDISC program in ROM, compatible with the 6502 second
processor. A special Econet compatible version has also been
produced.
1.5 HOW
DOES THE SIDEWAY RAM WORK?
If
you are already familiar with memory addressing on the BBC computer please skip
paragraphs 1.5.1 and 1.5.2.
1.5.1 MEMORY
ADDRESSING ON THE BBC COMPUTER:
The
BBC computer is built round the 6502 CPU, ICI on the main processor board. The
6502, like many other CPUs, uses 16 bits to address its memory. Each bit is
capable of being either o or 1, resulting in the number of 2 (for zeroes and
ones) to the power of 16 (for its 16 bits). In other words it can address
2x2x2x2x2x2x2x2x2x2x2x2x2x2x2x2 = 65,536 locations or bytes. To make it simpler
one can count in chunks of 1024 bytes or Kilobytes or Kbytes—65,536 are
equal to 64k bytes.
The
BBC 64k bytes are divided into three main areas: from the bottom up: the RAM
area, 32k bytes, then the Sideways ROM area, 16k bytes, and the MOS area the
remaining 16k bytes.
The
term RAM stands for Random Access Memory or memory that you can write to and
read from. ROM is, on the contrary, Read Only Memory or permanent memory,
non-erasable and written only once in the manufacturing process. The term MOS
stands for Machine Operating System. Inside the BBC computer each memory area
has a predetermined role: the RAM is the general working space for all sort of
programs, the Sideways ROM area usually contains BASIC, Disk Filing System (DFS)
Wordprocessor, etc., whereas the MOS keeps the machine busy and
responsive.
On
page 498 of your USER GUIDE you will find a map showing the RAM on the
right-hand side of the computer board and the ROMs just below
it.
1.5.2 THE SIDEWAYS ROMs
If
you open the computer case and remove the keyboard you will notice that the ROM
area actually has five sockets. Probably three of them are factory fitted: the
leftmost one is the MOS, next to it is the BASIC ROM and the DFS ROM. They are
all essential to the computer. You could compare the MOS with a landlord
controlling some 32k bytes of land (RAM) and a row of four socket/shops
(Sideways ROMs).
The
socket/shops may be occupied (by BASIC, DFS, etc.) or empty.
Every
time you power on or press the BREAK key the MOS landlord checks on his tenants;
he looks and tries to identify a copyrighted ROM. If this copyright (denoted by
the word ‘(c)’ programmed on to the ROM) is there, the socket/shop
is occupied, otherwise it is empty.
The
socket/shops are organised in a row. The MOS handles the task of choosing a
particular shop at any time to be placed in the 6502 memory in the manner of a
slide projector. The 6502 then ‘sees’ that socket/shop-slide. The
hardware and software to perform all this Sideways ROM slide show is quite
complex, but as far as the user is concerned the service shop/program such as
Word-processing, electronic filing, Speech, Graphic, etc., is brought to him/her
automatically by the MOS upon request.
Although
only four socket/shops are provided on the standard BBC computer the MOS is
capable of controlling up to 16 socket/shops. In other words there is still
commercial land to build an extra 12 shops. You guess that many firms will try
to supply the extra socket/shops. They can be REAL socket/shops (such as on
Sideways ROM extension boards), similar to the ones already installed or MUTANT
socket/shops such as the Sideways RAM system.
The
difference is: you PLUG ROM SOFTWARE CHIPS into REAL sockets, you LOAD the same
software from your DISKETTES into Sideways RAM which then MUTATE into ROM
chips.
This
explains why you cannot have both an extension ROM board and the Sideways RAM
system. This is like selling the same land to two different
companies.
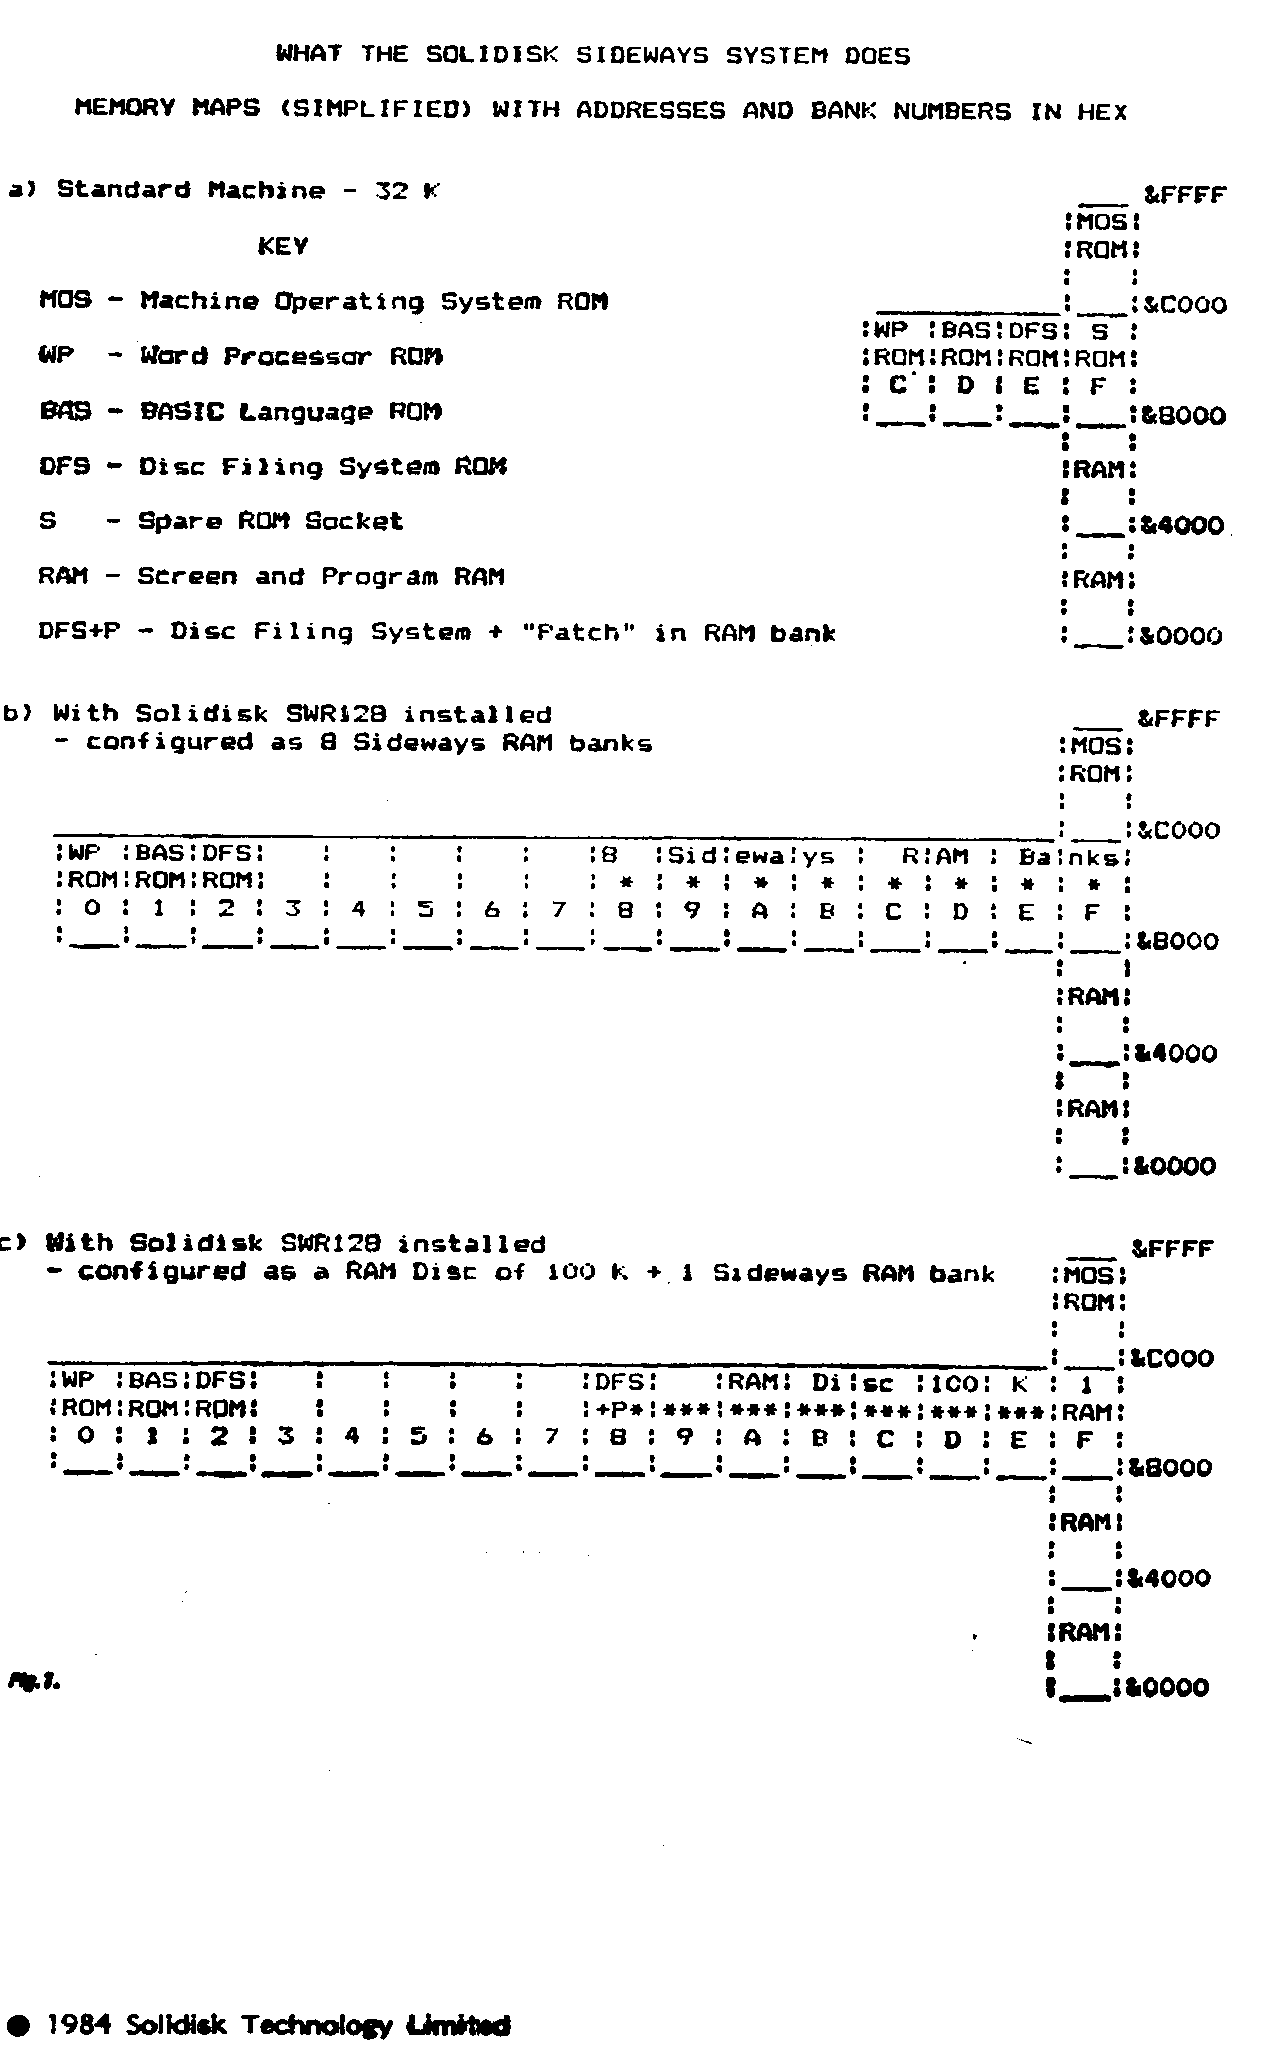
1.5.3 WHERE
IS THE SIDEWAYS RAM ON THE MEMORY MAP?
The
Sideways RAM system consists of additional RAM sharing the sideways area
(&8000) to &BFFF) in the BBC computer
with Sideways
ROMs. -. -
Unlike
Sideways ROMs the contents of Sideways RAM have to be loaded from disk (or tape
or Econet) and will be lost when the power goes off. If you load into Sideways
RAM memory the image of a Sideways ROM, the Sideways RAM will then be identical
to the ROM, a little like a video cassette
recorder.
You
can also load into Sideways RAM specially written programs such as those
supplied by the Software Support Service.
Fig.1
illustrates the memory map of a BBC computer fitted with Solidisk Sideways
system.
1.5.4 READING
AND WRITING INTO SIDEWAYS RAMS
Under
normal circumstances you should not be concerned with reading or writing into
Sideways RAMs. This job can be left to the MOS alone. You simply select the
program/software and it loads (writes) itself in one or two seconds. Unlike
having a ROM extension board, you lose one second each time, but there is no
limit to the number of programs you can use.
The
built-in hardware to select any one of the Sideways RAM is the pair
&F4-&FE30 for reading, &FE62-&FE60 for writing. This dual
selection allows one Sideways RAM or ROM to load software into another Sideways
RAM.
If
you are writing your own system software the rule is simple:
to
load software into a particular Sideways RAM, store number 15 into &FE62 and
the Sideways RAM number into &FE60. To read out the contents of any ROM or
RAM store the Sideways RAM number into &F4 and
&FE30.
For
more technical details please refer to section 3.2.5 or the SOLIDISK TECHNICAL
MANUAL.
1.6 USES
OF SIDEWAYS RAM:
The
first use of Sideways RAM is to run Sideways Software.
Broadly
speaking there are two categories of Sideways software:
Sideways
ROMs and Specially Written Programs (SWPs).
Sideways
ROMs are commercially available. You will have to transfer them to disk before
using them with the Sideways RAM system.
Specially
Written Programs (SWPs) are available only on diskettes, ready for use with your
Sideways RAM system. At present most SWPs are supplied by the Solidisk Software
Support Service. They are originally developed by Solidisk’s engineers to
support the products, but almost all new material is bought from Sideways RAM
users.
1.7 FREE
SOFTWARE FROM SOLIDISK
It
is important that you know about the Solidisk Sideways RAM Software Support
Service.
For
every Sideways RAM board sold £1
is spent on SWPs. When you buy your Sideways RAM
system you receive one free diskette. You can buy extra SWR UTILITY DISKS to
complete your collection. SWR UTILITY DISKS are organised in volumes, Volumes 3
and after have their own SUPPLEMENT to this MANUAL. Software available on these
disks is not for sale: it is free to any user and is given with as much
explanation
as possible. You can exchange old diskettes for new
diskettes at our stand at any Acorn exhibition or, for a small media charge of
£2.50, obtain them direct from SOLIDISK. Each month it is estimated that
more than 700 man hours are spent on SWPs, all paid for by new Sideways RAM
users.
Specially Written Programs fall into four main
categories:
1. ROM overlays such as the 65C02 program. They add extra
facilities and commands to existing ROMs. These programs are only useful if you
possess the relevant ROMs. The 65C02 assembler requires BASIC 2, the STL150
requires the Acorn DFS .90, the WORD64 requires Wordwise
1.17.
2. Language Programs such as the Solimon, Solitrace or
Keyboard; Service Programs such as the STLOEOO or the Printer program. They are
structurally similar to ROM software and will run on any BBC
computer.
3. Modular or Procedural programs such as the Solidisk
Datafile, the Stock Control program and the Macro Basic. These programs consist
of several disk resident modules (Solidisk Datafile) or libraries of Procedures
(Macro Basic) copied into Sideways RAM. These programs work with MAINFRAME
methods; they download wanted PROCEDURES from Sideways RAM and are capable of
outperforming the 6502 Second Processor.
4. Fast disk access programs such as Silexicon and
WORD64. These programs depend heavily on the speed of assessing a
great number of small portions of data so that although you can use them with
twin disk drives they are 100 times faster when using the
SOLIDISK.
Note 1.5.1:
All ROM software can have a SWP version, but no SWP will
work in ROM form.
If you would like to contribute your own program please ring
Southend (0702) 354674. The
usual rate of payment is £1 for every four bytes of machine
code.
Chapter
2: System Installation
- Check the utility disk
- Open the computer and install the Sideways RAM
- Test the Sideways RAM
2.1 CHECK
THE UTILITY DISK
2.1.1 BOOT
UP THE UTILITY DISK
Insert
the utility disk and boot up the disk by holding down the Shift key while
powering on the computer. Alternatively you can hold the Shift key down while
pressing the BREAK key. If a disk error occurs check the disk label The disk
label SWR40T requires a 40-track disk drive, SWR80T an 8o-track disk drive.
Switch your drive if necessary and repeat. You should see:
BBC
Computer
Acorn
DFS
BASIC
CHAIN
“MENU”
PLEASE
WAIT...
The
MENU program is a sort of HELLO program. Its purpose is to illustrate the way
the Sideways RAM is integrated into your computer. More about the MENU program
later on.
2.1.2 MAKE
ONE OR SEVERAL BACKUPS OF THE UTILITY DISK
Label
one of these the ‘LANGUAGE DISK’. Then *WIPE out all files on this
disc except:
- !BOOT
- MENU
2.1.3 TRANSFERRING
ROMs TO THE LANGUAGE DISK:
Boot
up the LANGUAGE disk as in 2.1.1
You
should now see:
SIDEWAYS
SOFTWARE FIRMWARE INSTALLED
|
0
4
8
C
BASIC*
|
1 2
5 6
9 A
D
DFS* E (*)
|
3
7
B
F
(*)
|
|
o Sideways RAM bank(s)
available
|
|
|
SWR40/01/10
DISK
DIRECTORY
|
|
|
A !BOOT B
MENU C
E F G
I J K
New
disk, press? Save SWR, press @
|
D
H
|
Enter
letter
(*
) NB:
This
MENU refers to the BBC computer before the base unit is installed. After this
installation BASIC and DFS will be moved up four lines, i.e. occupying box o and
box 1.
Secondly
the positions of the different ROMs may be different depending on the actual
setting of your machine. For example if you have TORCH Z80 card the MCP chip
would appear in box 2 or 3.
PRESS
THE ’@’ KEY
The
computer prompts
@—From
SWR slot (0 to F)?
Look
at the top part of the screen. Choose ‘D’ for example. You should
see:
SAVING
DFS in red.
The
screen refreshes. The disk directory will now contain DFS. If you want to save
any SWR on to disk, CHOOSE ‘@‘ and then SUPPLY the BOX NUMBER
as it appears in the TOP PART. Please note that the only acceptable reply in
this section is 0 . . . 9 then A, B,
C, D, E or F in capital letters. Giving a box number which does not contain a
name results in an error.
Repeat
the previous step several times to get used to the system.
2.2 CHECKING
THE BASE UNIT
The
base unit is a module measuring about 2in. x 2in. x 2in. with 11 wires. The base
unit is meant to be plugged into the rightmost ROM socket and the wires
connected to the main computer board.
Check
all the coloured wires against diagram 2.
Check
all the pins are straight; press them against a flat surface to straighten the
pins if necessary.
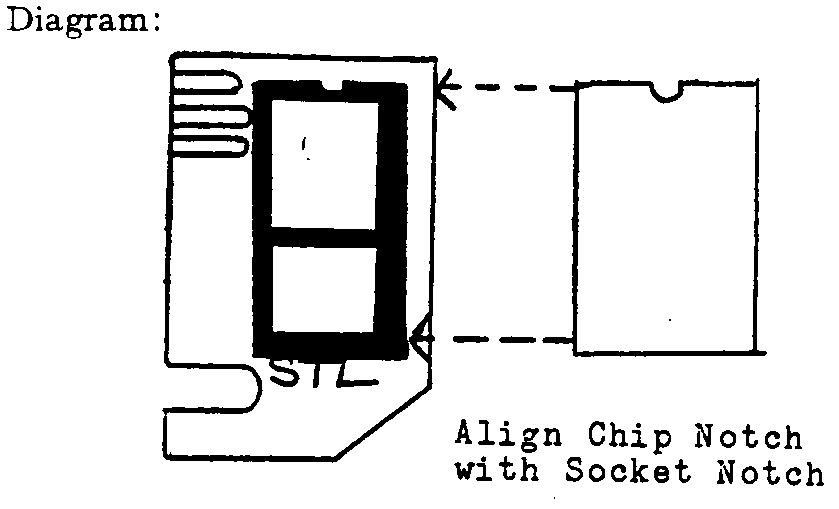
2.3 CHECKING
THE MINI ROM CARTRIDGE
The
Mini ROM cartridge is a small PCB with only one 28-pin socket soldered to it.
The card has a double row of ‘fingers’ and is meant to be inserted
into the (black) edge connector of the BASE unit. The finger portion also has a
slot which will mate with the plastic key position on the edge connector. Later
on, with the slot towards the South (nearer to you), you MUST install your ROM
so that the notch on the ROM is facing NORTH (see diagram page 12). We cannot
assume any responsibility for damage caused to your ROMs by wrong positioning.
If you are at all unsure, please ring us.
2.4 CHECKING THE RAMCARD
The
RAMCARD is the long board containing all the chips with a double row of
‘fingers’ on the right-hand side. Check that there is not wrapping
foil stuck to any part of the card.
IMPORTANT:
WRONG
CONNECTION WILL NOT DAMAGE YOUR
COMPUTER
BUT MAY LOCK IT UP. ALWAYS PROCEED
ONE
STEP AT A TIME. CHECK CAREFULLY BEFORE
MOVING
TO THE NEXT ONE. YOU MAY EVEN SEND US
THE
COMPUTER AND £12 FOR
SECURICOR COLLECTION,
OR,
EVEN BETTER, BRING YOUR COMPUTER TO US
FOR
FREE FITTING. NOTE OUR TELEPHONE NUMBER:
SOUTHEND
(0702) 354674
Note
2.4.1:
If
the coloured wires do not match diagram 2,
either return the base unit for replacement or mark
the wires according to their position in diagram 2,
thereby disregarding the colours.
2.5 REMOVE
THE TOP CASE
2.5.1
Undo the four screws labelled ‘FIX’, two at the rear of the
computer, two under the keyboard.
2.5.2
Undo the two fixing bolts. Slide the keyboard to the front, revealing the ROM
sockets. They are found in the right-hand corner. Three of them are factory
fitted with, from left to right: the MOS, the BASIC (black plastic ROM) and DFS
ROM (usually a brown ceramic EPROM with a sticker over the glass window). If you
have already got all five sockets filled up, remove the least frequently used
(NOT any of the three above) to make room for the base unit. However, copy it on
to the language disk using the MENU program (SEE SECTION 2.1).
2.6 INSTALL THE BASE UNIT
The
base unit plugs into the rightmost sideways ROM socket on the computer
board.
Check
all the pins of the base unit. Straighten them with a small screwdriver against
a flat surface (kitchen table) if necessary.
Note
2.6.1:
If
you have an issue 3 board you will notice that below the rightmost ROM socket
there is a small resistor (R153 or R163 100 /Ohm. 1/4
watt) not found on the issue 4 boards and later
boards. If you have a soldering iron you may cut R163 and bridge the two ends.
Otherwise simply bend it down VERY gently until there is enough clearance for
the base unit. If you also have a long blue capacitor in the vicinity you may
simply cut it out. The resistor and capacitor are suppressed on later issue
boards.
2.6.2 POSITION
THE BASE UNIT so that the card connector (colour black) is to the right and
all the pins are just above the socket receptacles. If the pins are slightly
splayed out, press them against a flat surface like the edge of a table to get
them exactly in line. Press the base unit until firmly down.
Note
2.6.2:
When
pressing down the base unit, the computer board may flex a little because there
is no spacer support right at the corner.
2.6.3 POWER
ON
The
Base unit should not have any effect on the computer.
2.7 USE THE MINI ROM CARTRIDGE
The
MINI ROM cartridge provides an easy way of inserting and removing Sideways ROMs.
When installing any ROM on to the cartridge, CHECK:
a) No
IC pin is bent or lies outside the socket.
b) The
ROM has the same orientation as if it were socketted on the computer board. The
BOTTOM of the cartridge has the word STL and the key slot.
Insert
any sideways ROM or even the Basic ROM into the Mini ROM cartridge. Insert the
cartridge into the card connector. Make sure that the ROM is orientated in the
same way as it was when installed an the BBC board, i.e. with the notch facing
NORTH. Power on the computer. Your Sideways ROM should still be running. If not,
check for bent pins on the base unit, bent IC pins on the Mini ROM cartridge,
and/or repeat the operation with another ROM. If you are unsuccessful ring for
advice. If all is well and the Sideways ROM is still running,
enter:
*BASIC
Insert
the LANGUAGE DISC and CHAIN “MENU”. The MENU should show the ROM in
the Mini cartridge in slot F;
Note
2.7:
At
this point 28 pins of the base unit have been proved to be making good contact
with the rightmost ROM socket. However, the Sideways RAM system requires another
four signals as we shall see later.
2.7.1 POWER OFF the
computer and remove the Mini ROM cartridge.
Note
2.7.1:
The
base unit is simply inserted into the ROM socket. Therefore it is advisable that
you keep the base unit steady in the ROM socket with one finger while pulling
out the Mini ROM cartridge. This will prevent the base unit from being
unnecessarily detached from the socket.
2.8 CONNECT THE CONTROL WIRES OF THE BASE
UNIT
If
you prefer to solder the wires, please UNPLUG the computer power lead before
soldering. Give a tap on the metal casing of the PSU with the soldering tip to
discharge eventual accumulation of static electricity. If you want to use
intermediate 40-pin IC sockets for connecting wires to IC1 and IC69, prefer
JERMYN make or MOLEX sockets (JERMYN part number J23040). Radiospare turned pin
types, although superior in quality, are NOT SUITABLE as there is not enough
room to accommodate both IC legs and wires.
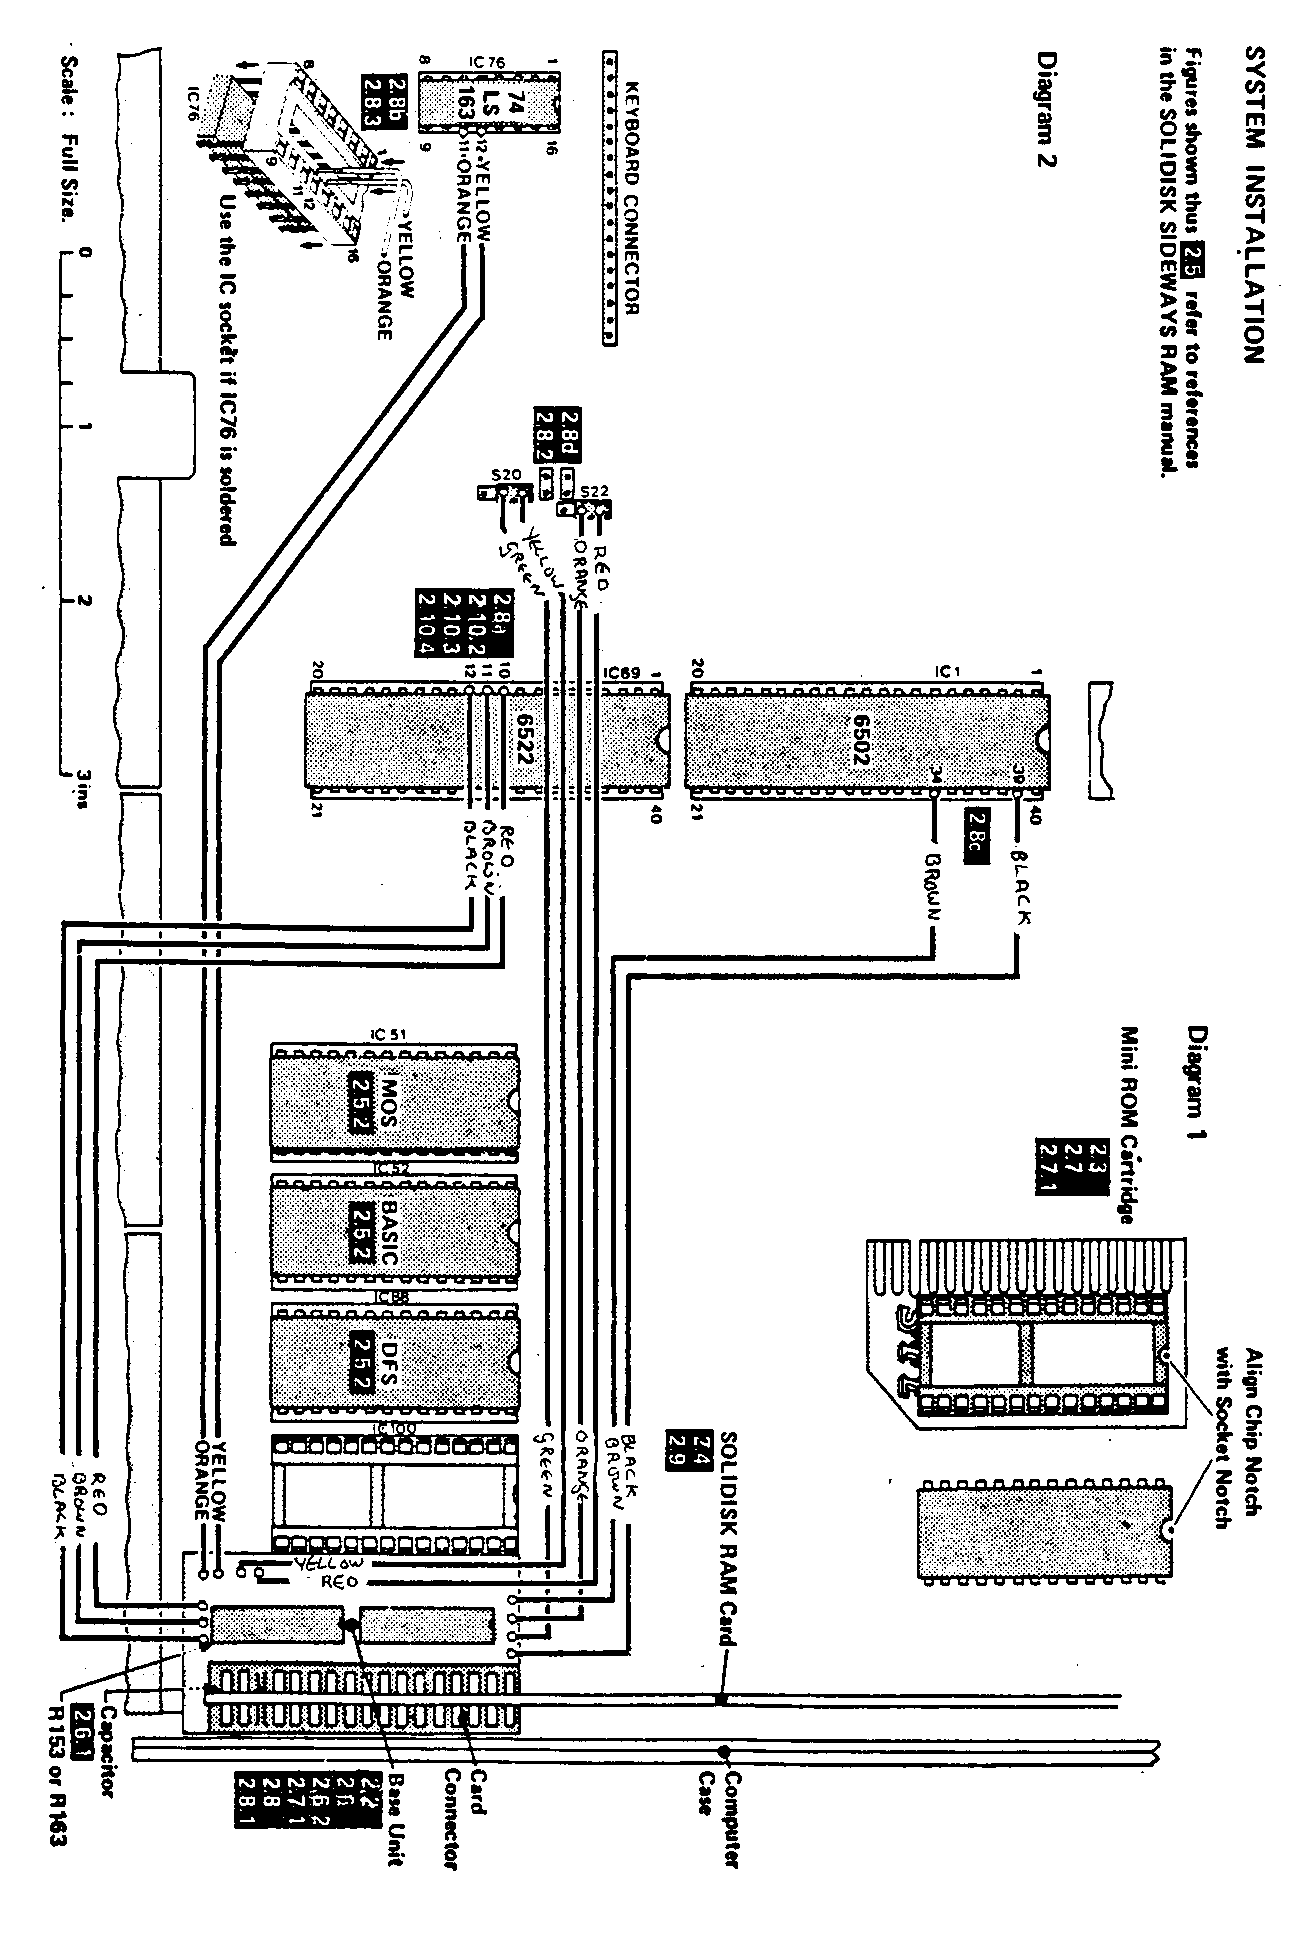
a) THREE
WIRES TO THE 6522 (1C69):
Pins
10, 11 and 12: Locate IC69 (6522, South of IC1). Remove it with a
small screwdriver, push the green (pin 10), yellow (pin 11) and orange (pin 12)
wires into the socket. Then line up the left row of IC pins in the socket so
that the three coloured wires are held in place, together with the IC pins 10,
11 and 12. Exert a little pressure on the right of the IC to align the
right-hand row of pins then press down firmly. The wires will be retained in the
socket at the same time as the IC pins.
This
operation is, in fact, quite easy. but if you are really wary simply raise the
IC about 5mm. so that the pins are still lined up. Push the wires in carefully
and press down on the chip. This method does not ensure you a ‘tight
fit’ but, in our experience, is perfectly adequate.
b) TWO
WIRES TO THE 74L5163 (IC 76):
These
are pins 11 (third up on the right) and 12 (fourth up). Locate 1C76 (74L5163
under the keyboard tail). Remove or raise the IC, push the two wire terminals
into the IC socket (yellow to pin 12, orange to pin 11) and press the IC down
into the socket. If this IC is soldered to the board (issues 4 and 7) use the
blue socket to extend the legs of the IC and simply, while holding the socket
with two fingers, push the wires into the same position (see
diagram).
Press
‘@‘ and then ‘F’ to save this ROM on to
disk.
This
is the trickiest operation on the whole, so take your time to make sure that the
blue socket legs are all correctly mating the IC legs and that the wires are not
too loose. If you have a soldering iron solder the wires directly to the IC
legs.
You
have gone through the worst and are left with only six wires to
fit.
c) TWO
WIRES TO THE 6502 (IC1):
Two
of them, yellow and orange, will go to the 6502 processor chip, North of the
6522 (IC69, see section 2.8a). The orange wire will be attached to pin ~, second
down on the right-hand side. The yellow wire will be attached to pin 39, the
seventh pin down on the right-hand side. Raise the IC, push in the two wires and
press down on the IC exactly as per section 2.8a above.
c) FOUR
WIRES TO S20 and S22:
Locate
the two jumper blocks labelled S20 and S22 on the BBC board. They are about half
an inch to the left of the 6522 (1C69). S20 is South of S22. Remove the
jumpers (colour black or blue—they are both initially in the North
position). Replace them with the white-ended plugs.
d) DECISIVE
TEST: POWER ON THE COMPUTER!
WATCH OUT FOR THE DREADFUL ‘Language?’
If you get ‘Language?’, then:
2.8.1 The
base unit was pulled slightly out of the ROM socket when you removed the Mini
ROM cartridge.
2.8.2 You
may have put the white-end plugs the wrong way round.
2.8.3 The
step (on 1C76) failed, the yellow and orange wires are not making proper contact
with the IC legs. Possible causes: loose blue socket, reversing the yellow and
orange wires or one of them has been detached.
Go back to the previous step. If you are not successful send
back the base unit for replacement.
Power off the computer. Keep the two jumpers in a safe
place.
Lay them on the keyboard PCB and seal with sticky
tape.
2.9 INSTALL
THE RAM CARD
Insert the RAM CARD in place of the Mini ROM
cartridge.
Power on. The RAM card should not affect the
computer.
Clear any ‘burr’ sometimes left over in the card
keyslot; make
sure that the RAMCARD is fully engaged.
2.10 TESTING
THE SIDEWAYS RAM
Insert the utility disk and press Shift Break to boot it up.
Just under the ‘Sideways Firmware Installed’ panel you will notice
the number of Sideways RAMs in your system. If you have a SWR16 this number is
1, a SWR32 gives 2, and a Solidisk gives 8.
If this number differs, the installation is not right.
Check as follows:
2.10.1 MENU SHOWS 0 SWR
BANK
Check
the two wires going to the 6502. Make sure that the ORANGE wire goes to pin
39’ North of the YELLOW wire. Make sure that none of them is detached from
the IC socket.
Detach
the three wires going to pin 10, 11 and 12 of IC69. Start again. The MENU
program should show one Sideways RAM bank available; otherwise the base unit is
faulty.
2.10.2 MENU SHOWS ONE SWR BANK WITH THE SWR32
OR
THE SOLIDISK:
Check
that the GREEN wide is not detached from pin 10 of the 6522 (IC69) or
connected to a wrong place.
Also
check that the green, yellow and orange wires go into their correct places on
the base unit, from left to right.
2.10.3 MENU SHOWS TWO SWR BANKS WITH THE
SOLIDISK:
Check
that the YELLOW wire is not detached from pin 11 or the 6522 (IC69) or
connected to a wrong place.
2.10.4 MENU SHOWS FOUR SWR BANKS WITH THE
SOLIDISK:
Check
that the orange wire is not detached from pin 12 of the
6522.
Check
that the yellow and orange wires going to 1C76 are not in the wrong way round.
Compare their position with the diagram and correct if
necessary.
2.10.5 MENU STILL DOES NOT SHOW THE RIGHT NUMBER
OF
SWR
BANKS:
The
base unit may be faulty. Please ring us for technical advice
(BETWEEN
4.30 and 5.30 p.m.)
2.10.6 TESTING ONE SWR BANK (STANDARD
TEST
FOR SWR16):
Power
on the computer and enter:
*PRINTER
<RETURN>
You
should see:
BBC
computer
Printer
Buffer
Acorn
DFS
BASIC
>
Now
enter
LOAD
“MENU” <RETURN>
<control>—B
LIST
<RETURN>
The
MENU program will be listed. Do not turn on your printer. The listing will then
be forced into the printer buffer. LIST it again a second time and a third time.
The Shift lock light will then be lit, signalling that the Printer Buffer is
full.
Now
turn on your printer; it win start printing immediately.
To
stop printing press the BREAK key.
A
faulty RAM card will not go through this test and will
‘hang’
the
computer.
2.10.7 TESTING THE SOLIDISK:
Place the utility disc in the disc drive and
enter:
*E. L <RETURN>
You should see displayed a list of function key
settings.
Hit the space bar.
Enter:
*.1 <RETURN>
You should see:
190 (00)
Drive: 1 OPTION
:0
Directory:$ Library:$
>
If the number on the top left corner is not ‘1
go’ enter:
*BANK E <RETURN>
Then
* .1 again. The command *BANK sets the Solidisk RAMTOP. More about the RAM DISC
later.
Power off.
2.11 REPLACE THE KEYBOARD AND THE TOP
CASE
Chapter
3: Solidisk
Specially Written Programs
**NOTE: Certain programs are overlays for Sideways ROM
software, such as STL150 for the Acorn, .90 DFS and WORD64 for Computer
Concepts, due to their popularity. Their use implies that the above-mentioned
ROMs be installed on your system. They are not in any way essential to the
performance of Solidisk Sideways RAM system. They merely add some desirable
facilities to the existing features of the ROMs. The advertisement of these
programs does not infringe the Sale of Goods Act with regard to the description
of the merchandise. Specially written programs as supplied free to all Sideways
RAM users are divided into volumes. Each volume i5 recorded on a 4o-track single
density disk format compatible with all versions of Acorn disk filing systems.
In some circumstances we may be able to supply these volumes or. 8o-track
diskettes each containing two consecutive volumes. Volumes 1 to 10 are intended
to be the basic software library for the Solidisk Sideways RAM system. Volumes
11 and above are Source Code and Technical Documentation; they are very useful
if you intend to write your own Sideways Software. Volumes 20 to 30 will be
games software.
At present Volumes 1 to 9 are out; volume 10 is under
preparation; Volumes 11 to 20 are not in production due to delay with the
TECHNICAL MANUAL.
Although the software is free, as it is paid for every month
by new Sideways RAM users, the media (diskettes) are not. Solidisk Software
Support Service will charge £2.50 for every new diskette to cover the cost
of the media. Packing and postage for any number of diskettes is fixed at
£1 per parcel.
If you need to enquire about the Software Support Service
please telephone Southend (0702) 354674, preferably in the afternoon between
4.30 and 5.30. Do not worry about the telephone lines being jammed
—we now have ten lines open for customer
enquiries.
3.1 VOLUME 1
3.1.1 THE
MENU PROGRAM AND THE COMPUTER RESOURCES
The
MENU program presents the computer resources in three parts:
- The Sideways Firmware Installed (the top
part)
- The number of Sideways RAM banks still available and the disk
title (the middle part)
- The disk directory (the bottom
part)
3.1.1.1 FIRST
THE SIDEWAYS SYSTEM
The
BBC computer can use up to 16 Sideways ROMs or RAMs. The Sideways ROMs axe
normally inserted into Sideways ROM sockets. The Sideways RAMs do not have
sockets, of their own but use the rightmost socket collectively. The machine
does not make any distinction between ROMs or RAMs. If there is any Sideways
System software in the socket the name of the software will be displayed in the
corresponding box. For example the screen shows that the BASIC ROM is in the
leftmost socket (number=0), the Acorn DFS ROM is in the next socket (number=1).
When you power on the computer there is no SWP or ROM program loaded into
Sideways RAM and 13 boxes from 3 to F are empty. Later on, when you load in any
Sideways program such as STLOEOO, the name of the RAM (or ‘ROM’)
will be in one of the 13 boxes from 3 to F.
Note
3.1.1.1
Although
16 Sideways RAM banks are available with the 256k Solidisk only 13
banks are normally usable by the MENU program. The remaining three banks (0, 1
and 2) are reserved for RAM DISK use.
3.1.1.2 THE SIDEWAYS RAM BANK(S)
AVAILABLE
This
information shows you how many ‘Languages’ or ‘Services you
can install into your system before you start using the
computer.
3.1.1.3 THE DISK TITLE
The
disk title contains the creation date of your Utility disk. This User Manual
refers to the current diskette (OCT. 84).
3.1.1.4 THE DISK DIRECTORY:
This
is the middle part of the screen. All disk filenames are displayed in
alphabetical order. A green letter to the left of each filename facilitates your
choice.
3.1.1.5 SELECTING A PROGRAM:
To
select a file press the corresponding green letter. If the file is a text file
it will be printed, a Basic program CHAINED, a machine code program will be
RUNned or loaded depending on other criteria. Sideways software is treated
differently. It will be loaded one program at a time into consecutive Sideways
RAM banks (or boxes), starting at the lowest priority bank (or box). As soon as
a sideways software is loaded the name will appear in the corresponding box.
When you finish choosing your software press the BREAK key. But try this
first:
- Press the letter A.
You should see:
A-PRINT
!BOOT (Y/N)
2) Press
Y
The
!BOOT file will be displayed on the screen, i.e. PAGE=&100:CHAIN
“MENU”
3) Press
the letter K
K-PRINT
help! (Y/N)
4) Press
Y
The
help! text will be displayed.
- Insert the LANGUAGE DISK. Press the?
You will see printed: New disk, please
wait...
The
top part of the screen does not change but the directory of the new disk will be
displayed.
3.1.1.6 RUNNING
FROM BASED SOFTWARE
Under
the ‘Sideways Firmware Installed’ panel you will find the number of
Sideways RAMs available or the number of Languages and Services you can select
from your diskettes to be part of your machine at any time. You can choose any
language or service in direct mode or set up everything you need using the MENU
program.
3.1.1.7 DIRECT
LOADING OF SIDEWAYS SOFTWARE
Ideal
for the 16k Sideways RAM (SWR16) and quite useful with larger units, the direct
mode loads into Sideways RAM bank (or box) F, the last one.
Note
that you do not have to load into Sideways RAM everything before you start using
the computer. To load any Language or Service enter ‘*‘ followed by
the filename. The screen will then be cleared and the Sideways RAM
‘F’ loaded.
Evoke
the Language or Service with the appropriate * command as
usual.
Example:
To
load and run STLOEOO, enter:
*STLOEOO
<RETURN>
To
load and run VMP1.0:
*VMP1.0
<RETURN>
etc.
3.1.1.8 USING
THE MENU PROGRAM TO SET UP SIDEWAYS SOFTWARE
The
MENU program helps to set up the computer resources BEFORE you start using
it.
Enter:
CHAIN”MENU”
<RETURN>
In
the disk directory section there is a green letter in front of each
filename.
Press
the letter in front of any Sideways ROM file. Your disk should whirr away a
couple of seconds and the name of the
Sideways
ROM should appear in box 8 if you have a Solidisk, in box E if you have a SWR32,
and in box F if you have a SWR16. That is now part of your Sideways Firmware.
Choosing a second Sideways ROM file will load it automatically into the next
Sideways RAM, i.e. box 9 (or F with the SWR32). As more Sideways ROMs are being
loaded in successive banks the number of Sideways RAMs is decreased each time
until reaching 1 (box F). This Sideways RAM box is always kept open, like
a free port. You can always load into it anything at any time. To warn you that
the system is reaching its free port a message will be
displayed.
CHANGING THE SIDEWAYS RAM BOX:
If
you want to load your Sideways Software in a particular ‘box’ you
can use the left or right triangular brackets (they are on the left of the
‘?‘ key). The selected box will be indicated just below the number
of Sideways RAMs.
To
leave the MENU program simply press the BREAK key. Now enter:
*HELP
<RETURN>
All
your software titles should be displayed.
3.1.1.9 MODIFYING
THE MENU PROGRAM
If
you have a double-sided disk drive you may want to change line 120 to read
PROCdrive (2) after formatting and saving some programs on the second side of
the diskette. Please remember not to copy this modified MENU on to single-sided
diskettes as it may look in vain for a non-existent directory.
3.1.2 THE
PRINTER BUFFER PROGRAM:
You
can load the Printer Buffer program from the Menu or directly by:
*PRINTER.
The
program intercepts the put, remove and count characters sent to the printer. The
Printer Buffer will feed your printer in the background, so you can use your
computer immediately. It is very useful for any application.
Your
printer is turned on by Control-B (or VDU2) and off by Control-C (or VDU3) as
usual. The Break key will stop printing and clear the printer
buffer.
You
cannot have two Printer Buffers at the same time.
3.1.3 THE
INDEX PROGRAM
3.1.3.1 USE:
This
programme allows you to set up a ‘Mailing List’ as simply as
possible. You can also use the program for similar ”look-up”
applications such as price list, stock inventory, patient prescriptions, etc.
You can INDEX any data file containing up to 1,100 records of any
length.
3.1.3.2
DATAFILE FORMAT
Datafiles
that can be indexed are pure ASCII or textfiles and should be created by a
wordprocessor such as Wordwise. Some wordprocessors require you to SCREEN or to
EXEC (other words for * SPOOL text to disk). You can also make up an indexable
datafile using existing databases by SPOOLing all the records required to disk.
You then get a printout of it, count the number of fields, etc., and give
appropriate answers to the INDEX program. There is a sample datafile
‘MAIL’ on your utility disk in which:
- Every record is in plain ASCII. Each record is separated from
the next one by double carriage return.
- The first field (‘name’) is used for indexing;
seven characters or spaces are skipped before the ‘Most Significant
Letter’ is picked up for sorting. Other fields like address, town, etc.,
can be anything and any number and organised in any
manner.
3.1.3.3 INDEX
IS A SEQUENTIAL FILING SYSTEM
The
difference between INDEX and other databases is that INDEX accepts any number of
fields and any record size as far as the number of records does not exceed 1100.
Fields are written successively, as are records. Any character—such as the
carriage return—can be used to separate fields. Any two characters such as
/ <RET> or two field delimiters (empty field) can be used to separate
records. The INDEX allows you to lay out your datafile exactly as you would do
on a piece of paper.
3.1.3.4 HOW TO USE THE INDEX?
Copy
INDEX and MAIL to a blank formatted disk.
CHAIN’
‘INDEX” as with any ordinary BASIC program. Press <RETURN> to
each question as it is set up already for use with the default
parameters.
You
should then see:
BBC
computer
MAIL
:INDEX
Acorn
DFS
BASIC
>
MAIL
is the datafile chosen by default. The Index file of MAIL is now created in
Sideways RAM. Later on, when you use the program with your own datafiles, you
may wish to make up Index files for STOCK, PRICES, PRSCRPT,
etc.
Now
enter: *INDEX
The
disc drive will be whirring for about 15 seconds. Index searches through
‘MAIL’ for records and field delimiters, saves these in Sideways RAM
and copies itself to your disk under SI.MAIL (SI stands for Sequential
Index).
You
can check this point by *CAT. Now enter: *LIST
You
should see all records displayed in alphabetical order. Switch off the
computer.
3.1.3.5 INDEX
IS ALWAYS READY:
Switch
on the computer and enter *SI.MAIL.
Your
computer is ready.
INDEX
has some built-in ‘star’ commands. Please try:
3.1.3.6 *LIST
This
command will list your datafile in alphabetical order according to the criteria
input to the INDEX program. In the MAIL example the default sort criterion was
the SURNAME. In field 0, skip 7 characters, including spaces. after the
beginning of the record. E.g.: Mr 3 F Kennedy’s record will be
sorted by the letter K. (There are seven characters, including spaces, before
the letter K or Kennedy.) “If you wish to sort MAIL by the town, answer 5
to field, 0 to ‘before the Most Significant
Letter’.
3.1.3.7 *GET
This
command displays the next record in order. You would say *LIST actually performs
*GET from the beginning to the end of the file. There is a little bit more to
*GET. If a name (or a town in the second example) is also given. *GET will
rather display the best matching record. So *G K (or *G. KEN or *G. KENNEDY)
would display:
Mr
J F Kennedy
13
Friday Road
Danbury
Essex
SS2 5JQ
Other
variations of these two commands are:
*LIST
<n.mail>
This
command will list MAIL but also spool the output to the file <n.mail> for
other use as mail merge.
*PRINT
This
is identical to *LIST but activates also the printer.
*STEP
This
is opposite to *GET; this command will display the record before the last
one.
3.1.3.8 ADDING
MORE NAMES AND ADDRESSES
The
MAIL sample datafile is done with WORDWISE. You can edit it as you like. Other
Wordprocessors will require that you create a new document and MERGE the MAIL
file. For compatibility you must SPOOL your datafile to disk before indexing
it.
For
example, you want to keep a diary about everybody you know. Firsts using a
wordprocessor alter all the names and addresses to real names and addresses of
people you know. Every time you need to refer to Mrs. X. simply enter *G.
X.
Every
time something happens to Mrs X, use your wordprocessor and simply add extra
text lines to her record.
Note
3.1.3.8:
You
will have to *INDEX every time the datafile is changed as the places where INDEX
expects to find your records are changed.
3.1.4 THE
STLOEOO PROGRAM
STLOEOO
IS A DISK FILING SYSTEM
The
STLOEOO is only compatible with the Single density 8271 disk controller as with
all Acorn Disk Systems (not with any Double Density controller). STLOEOO is not
capable of loading Sideways Software.
You
can load STLOEOO from the MENU or simply by:
*STLOEOO
<RETURN>
Note
3.1.4.1.:
Solidisk
Double Density Version of STLOEOO is contained in volume g under the name of
DDFSEOO. Although functionally identical, they are not interchangeable. Users of
STL DDFS must destroy the STLOEOO program and replace with DDFSEOO on all
language diskettes. Disk corruption may result if STLOEOO is wrongly used on the
DDFS.
3.1.4.2 STLOEOO SETS PAGE=&EOO
The
normal DFS requires memory workspace between &OEOO to &1900 and sets
PAGE at &1900. STLOEOO uses Sideways RAM for its workspace, thus leaving
PAGE at the lowest possible value of &EOO, increasing memory for BASIC,
VIEW. BEEBCALC, etc., and allowing tape-based programs to run on disk
system.
3.1.4.3 STLOEOO HAS EXTRA DFS
UTILITIES
Enter
*HELP DFS and *HELP UTILS. The list of DFS commands and utilities will be
displayed.
You
will notice that STLOEOO has three extra commands:
*F40
(disk formatter for 40-track drive), *F80 and *VERIFY To format a 40-track disk,
switch on the computer and enter:
*STLOEOO
<RETURN>
Insert
a blank disk into drive 0. Enter:
*ENABLE
<RETURN>
*F40
<RETURN>
To
format an 8o-track disk, enter:
*ENABLE
<RETURN>
:F8o
<RETURN>
The
drive number must be supplied if the blank disk is not inserted in the current
drive:
e.g. *F8o
1 <RETURN>
To
‘kill’ it, enter:
?&8006=0
<RETURN>
<BREAK>
To
revive it, enter:
?&8006=1300
<RETURN>
<BREAK>
This
method is correct for all types of Software running in Sideways RAM. Location
&8006 contains the ROM type. If you want to kill any language or service
program in the Sideways RAM system, store 0 at &8006 and to revive it store
130. For example: to kill the STLDISC in Sideways RAM number 14, do the
following:
?&FE62=15:?&FE60=14
<RETURN>
?&80060
<RETURN>
<BREAK>
3.1.5 THE
STL150 PROGRAM:
This
program allows PAGE at 0E00 and up to 150 directory entries per disk surface
(300 on a double-sided disk).
3,1.5.1. STL150 IS AN OVERLAY FOR ACORN .90
DFS
The
STL150 therefore requires Acorn DFS .90
3.1.5.2 STL150
ALLOWS UP TO 150 FILENAMES PER SUE:
Word
processor users can take advantage of more directory entries, up to 150 per
side. This process is absolutely transparent to normal LOAD and SAVE. Diskettes
formatted with STL150 are fully compatible with other DFSs.
The
extra capacity of the directory comes from the use of five ordinary catalogs:
STL0 to STL4 occupy the totality of track 0. When a filename is
requested, STL150 looks first in the current catalog. If the filename is not
there it goes back to the ‘root’ of this catalog which can only be
one of STL0 to STL4. It then tries other roots until either the filename is
found or will have to be created. This process is transparent and extremely
fast. STL150 will create as many roots as required.
Each
root STLx has its own domain on the disk and is protected against accidental
DELETE.
STL150
has its own *F40 and *F80 commands to prepare your blank diskettes. STL150 can
read and write normally formatted disks but cannot extend their directories.
Other DFS can only read and write specially formatted disks in their current
domain. You MUST NOT *compact an STL150 disk using another DFS. The disk is
normally protected against accidental destruction, but we cannot guarantee it is
tamperproof.
STL150
has a very fast *COMPACT to enable it to cope with the large disk size and large
number of files. The disk head does not return to track 0 while COMPACTING.
Therefore you should never press the BREAK key while
*COMPACTING.
The
command *STLx will move the partial directory STLx to be stored in sectors 0 and
of the disc, thus making it accessible to any other DFS. It will not affect the
STL150 as the latter scans all five directories before every file operation. For
example: if you want to let your friend use your disc on his BBC to read files
held in part 3 of your disc, do *STL3. If this STL3 has not been
created you will get ‘Bad Cat’ Error.
3.1.5.3 FAST LOADING STL150
While
STL150 is still in your computer, save it with:
*SAVE
STL150C 8000+4000 D9CD
You
can give any other suitable name to avoid the original STL150 program being
deleted. From now on, simply enter:
*STL150C
<RET>
STL150
should be reinstalled in your machine.
Using
STL150(C) sometimes may surprise you.
Suppose
you have specifically formatted a disc with the STL150 and you have created on
this disc 50 files. This disc contains also the STL150C on the first directory
(STL0). The following day you switch on the computer and type
in:
*STL150C
<RETURN>
You
will certainly get a ‘Bad command’ error. If you enter
*.<RETURN> you will not find STL150C on the current
catalog.
The
reason for this strange situation lies in the fact that STL150, the new catalog,
is the one currently active, not the first one, which is hidden away. To avoid
this situation happening, always keep a copy of STL150C on the language disk and
set up STL150C before inserting any specially formatted disk.
Now
that the work on Solidisk’s own DFS 2.0 is completed, a new version of
STL150 will cope with any disk system while offering unlimited directory
entries, not just 150, and furthermore it does not require any specially
formatted disk. As a result you will not have to transfer/modify any existing
diskettes to use this advanced facility.
3.1.6 THE
STLDISC PROGRAM:
This
program creates a RAM DISK in your system with built-in formatter and
verifier.
3.1.6.1 THE
STLDISC PROGRAM IS AN ADVANCED DISK FILING SYSTEM
The
disc filing system is an important part of your computer. It handles program
loading, saving and many other functions of storage and retrieval of your
software and data.
The
STLDISC program has all the usual facilities of a good disk filing system such
as speed of operations informative directory display, fast BPUT and BGET,
built-in disk formatter and verifier. It also handles the RAM DISK or
Solidisk.
3.1.6.2
THE SOLIDISK AS AN EXTRA DISK DRIVE
The
Solidisk is a large Sideways RAM system of 128k or 256k bytes, represented as
eight banks of Sideways RAMs (box 8 to box F on the MENU screen) or 16 banks
with the 256k unit. You can use the Solidisk to load your Sideways Software, up
to eight different languages and services or up to 13 with the 256k unit at any
time. You can also use some of the Sideways RAM banks (or boxes) as an extra
disk drive or RAM disk.
The
RAM disk in its function as a storage device is identical to a floppy disk
drive, just a lot faster as there is no mechanical movement
involved.
The
differences with a real disk drive are:
- The contents of the RAM disk is lost if the power is
lost.
- The contents of the RAM disk have to be copied (or backup-ed)
from a real disk.
- The nominal drive number of the RAM disc can be altered at
will without affecting its contents. The normal drive numbers for a real drive
are 0, 1, 2 and 3. The RAM disk can be given 0, 1, 2, 3 and 4. The command
*OPT2, <drive number> is used to attribute any other number than
1.
- The size of the RAM disk depends on the box you choose to
install the STLDISC program. If STLDISC is loaded into box E, its size will be
bigger than if it is loaded into box D, smaller than if it is loaded into box F.
In any case, the size of the RAM disk will be displayed with its
directory.
3.1.6.3 SETTING
UP THE SOLIDISK:
You
can choose STLDIC by *EXEC the loader program (‘L’ on your utility
disk); this is the normal way when you want the biggest possible
Solidisk.
You
can also load the STLDISC with the MENU program. This is the correct way when
you do not have the full 128k Solidisk.
If
you enter:
*E.L
<RETURN>
you
should see a text informing you that eight function keys are set up to use the
Solidisk. They are as follows:
f0=
Backup drive 0 to drive 1. This key duplicates the disk in drive 0 on to the
Solidisk. This operation is performed in only 13 seconds and requires that the
disk in drive 0 is formatted in 40 tracks, i.e. its capacity cannot be bigger
than 100k bytes.
f1
= Copy every file from drive 0 to drive 1. This key copies as many files as
there is still space in the Solidisk, from drive 0 to the Solidisk (drive 1).
The order in which files are copied across is ‘last in first copied’
(not very clever, is it?). The disk in drive 0 can be 40 or 80 tracks. You
cannot backup an 80-track disk on to the Solidisk which has only the capacity of
4o-track recording. You will get ‘Disk full’ error.
f2=
Catalog both drive 0 and drive 1, the Solidisk.
f3=
Performs verify. It is useful sometimes to verify the contents of the Solidisk,
especially before making a hard backup.
f4=
Run Silexicon. The Silexicon disk must be in drive 0.
f5
= Run WORD64. The WW64 disk must be in drive 0. We shall see later how to
prepare the Silexicon disk and the Word64 disk.
f6=
*DRIVE 0 <RETURN>, select drive 0 as the current drive.
f7=
*DRIVE 17 <RETURN>, select the Solidisk (drive 1 as
current
drive).
We
shall come back with more details on many aspects of the Solidisk and the use of
the function keys.
The
last line on the screen says that the STLDISC program is going to be loaded into
bank E.
After
reading the message:
“Press
any key when ready”
Press
the space bar (or any other key).
You
should now see:
BBC
computer 32k
STLDISC
BASIC
>
It
can now be said that the Solidisk is created from Sideways RAMs and its presence
is indicated on the screen. Drive 0 is still the same, drive 1 is the Solidisk.
If you have a twin-disk system the physical drive is now disabled. If you did
not have a twin-disk drive before, you have now.
Now
type in:
*.1
<RETURN>
190 (00)
Drive
:o Option:0
Directory :$ Library: $
Note
3.1.6.3:
The
drive number 1 is attributed to the STLDISC simply for convenience. If you wish
to use four real drives together with the STLDISC, enter *OPT2,4 <RETURN>.
If you need to disable the STLDICS you may enter *OPT2,255 <RETURN>. This
command is only added for completeness.
The
RAM DISK size is displayed at the top left corner: 190(hex) is 400 sectors or
100k bytes.
With
the 256k Silicon disk this number is 320 (hex) or 800 sectors.
3.1.6.4 A
QUICK DEMONSTRATION WITH THE SOLIDISK:
(This
demonstration is only relevant to the 128k Solidisk or above).
You
have seen previously that eight function keys (the red keys in the top row of
the computer keyboard) f0 to f7 are programmed for the Solidisk. Insert the
sideways 40-track diskette into drive 0. Press the ‘f0’
key.
You
should see:
*EN.
*BAC.01
Key
f0 is simply programmed to type in your computer *ENABLE <RETURN> followed
by *BACKUP 01 <RETURN>, exactly as you would do with a twin-disk
system.
Now
remove your diskette and insert into drive o a blank diskette and
enter:
*ENABLE
<RETURN>
*F40
0 <RETURN>
The
diskette will be formatted in around 19 seconds. Now enter:
*ENABLE
<RETURN>
*BACKUP10
<RETURN>
You
will hear drive o spinning and immediately see:
COPYING
FROM DRIVE 1 to DRIVE 0
Then
drive o stops. You have made a backup of the original diskette. The Solidisk
allows you to work fast with disk systems.
- ANOTHER DEMONSTRATION WITH THE
SOLIDISK
Now
place the SWR UTILITY (volume 2 or 1 + 2) disk into drive o. Press the
‘f4’ key You should see:
*COPY
01 T1
*COPY
01 DIC
*
:o.SILEX
The
Silexicon program will ask for the filename of the text that you wish to
spellcheck. Please enter:
help!
<RETURN>
Note
the bargraph at the bottom of the screen. It indicates the remaining length of
file help! and goes on diminishing. At the same time the score of mis-spelt
words clocks up at an alarming rate. The Silexicon scans for help! in just under
15 seconds.
Press the <ESC> and choose option 3.
3.1.6.6 MAKING SPECIALLY PREPARED
DISKS:
It
is convenient to have disks specially made for use with your Solidisk for
applications such as Silexicon, WW64, Solidisk Datafile, Macro Basic and VMP.
Other disks could be made for Beebug Masterfile, Starbase, View, Ultracalc, etc.
They all have the same !BOOT file and STLDISC program. Each of them will then
have an appropriate loader file.
You
can create as many loader files as you need to set up particular applications.
For example: volume 4 contains a different loader for Solidisk
datafile.
To
make a disc for Beebug Masterfile, set up the Solidisk with *E.L as in 3.1.6.
Now place the Beebug Masterfile diskette into drive 0 and
enter:
*ENABLE
<RETURN>
*BACKUP
01 <RETURN>
Remove
the Masterfile and place Volume 2 or 1+2 diskette in drive 0, then
enter:
*COPY
01 !MF <RETURN>
*COPY
01 STLDISC <RETURN>
Now
place a blank diskette in drive a, format it and make a backup:
*ENABLE
<RETURN>
*F40
0 <RETURN>
Then:
*ENABLE
<RETURN>
*BACKUP
10 <RETURN>
That
is it.
To
use Silicon disk with Masterfile, switch on the computer, place the !MF disk in
drive o, then enter:
*E.
!MF <RETURN>
There
will be a message to remind you two things: to start press f0, and when you have
finished press f9.
NOTE:
You
must add one extra line in MFUtils: load MFUtils from the !MF disk then add:
15 *OPT2 <RETURN>
Save
the edited version of MFUtils.
This
version works with or without the Solidisk.
SOLIDISK
WITH WORDWISE, VIEW & VIEWSHEET:
Simply
copy L and STLDISC to a new disc.
SOLIDISK
WITH SCRIBE:
Volume
2 contains also !SC. You can follow the same procedure as with Masterfile. Copy
the utility disk into Solidisk, then add !SC and STLDISC before backing it up on
a blank new disc.
Make
your own loader:
You
can make your own loader for any application using
*BUILD
Start
the Solidisk with *E.L., then enter:
*BUILD
:i.!BOOT <RETURN>
1-
*KEYo etc.
2-
*KEY1 etc
3-
etc.
4-?>&FE62=15:?&FE60=14:*STLDISC
<ESCAPE>
Enter
now:
*COPY
0 1 STLDISC <RETURN>
*OPT
4,3 <RETURN>
*COPY
your program and data to the Solidisk. Make a backup of the Solidisk to a new
disk.
3.1.6.7 THE
SOLIDISK AND THE INDEX PROGRAM:
The
Solidisk is a very good tool for any database program, especially when sorting
datafile using either a conventional database program or the INDEX program. Copy
the relevant datafile and its associated ‘SI’ file (such as MAIL and
SI. MAIL). Boot up the Solidisk as usual by Shift-Break. Press the
‘f0’ key to duplicate your diskette to Solidisk. You can make a
sorted list for printout or mail merge as follows:
Place
a FORMATTED disk in drive o. Enter:
*DRIVE
1
*LIST
:0.SRTMAIL <RETURN>
The
Mail (or any other datafile) will be sorted in alphabetical order and spooled on
to drive o under filename SRTMAIL at around 2,000 characters a second. It must
be the fastest method of sorting on earth. With other databases, refer to the
appropriate manual.
3.1.6.8 THE
SOLIDISK AT WORK
Solidisk
can be an excellent productivity tool for Word-processing, databases and
programming.
3.1.6.8.1 SOLIDISK
WITH WORD PROCESSORS:
You
can edit documents of up to 26 pages (A4 size, 4,000 words, 95,000
characters) with the 128k Solidisk—twice as much with the 256k Solidisk.
Larger documents (books) will have to be split into smaller sections. There is
no gain in speed using the Solidisk when the document is first typed in. So use
your conventional set-up, with the physical drive, so that there is no need to
make frequent backup.
But
for editing, changing words, phrases, moving blocks, formatting pages, printing,
counting words, previewing, search and replace, etc., the Solidisk is simply
marvellous. So copy the draft version to your special Solidisk + Wordprocessor
and use the Solidisk then at its best advantage.
Please
do not forget to make frequent backups of the edited version of your text as the
contents of the Solidisk is not permanent.
3.1.6.8.2 SOLIDISK
WITH DATABASES
Beebug’s
Masterfile and the more recent GCC’s Starbase are popular databases.
Starbase requires that drive 0 must be used to hold the datafile. Start with *EL
<RETURN> as usual. Press fo key. Now enter: *OPT2,0
<RETURN>
The
Solidisk is then ready as drive o. You can then enter
*STARBASE
<RETURN>
When
you have finished with the programs, quit as usual and then enter *OPT2,1 to
reselect Solidisk as drive 1 before backup. Note that the use of the Solidisk
with databases has a degree of risk to destroy your database due to miskeying.
As the Solidisk is so fast, and silent, it can wipe clean your databases even
before you remove the finger from the wrong key. Therefore we strongly advise
not to use the Solidisk for amendments of records. The Solidisk is ideal for
viewing or browsing, printing and sorting.
Always
make at least two backup copies of your datafile and one on the Solidisk +
Database.
The
Solidisk saves you an enormous amount of time and disk wear. It makes the
analysis work on the database enjoyable and look more professional. It may be
easy, for example, to show the whole list of Solidisk Sideways RAM users, but it
will take days to regroup them by regions. (We set a target for ourselves to
sort them both by county and by alphabetical order in under an hour using the
BBC and the 256k Solidisk. We haven’t done it yet but believe that it is
not impossible.)
IMPORTANT:
***** BACKUP THE SOLIDISK OR COPY THE DATAFILE AND DESCRIPTOR FILE BEFORE YOU
SWITCH OFF *****
3.1.6.8.3 SOLIDISK
IN DISC COPYING
When
you are using the BBC computer not only for fun but to make a living (like; me),
your Solidisk can be very helpful. One of the uses is disk
copying.
You
can make up a loading file as follows:
*BUILD
SPECI.L
1
*K.0 *EN.//M*F400//M*EN.//M*BAC.40//M
2
*K.2 *EN.//M*F401//M*EN.//M*BAC.41//M
3
*K.9 *EN.//M*BAC.01//M*0PT2.4
4
?&FE62=15:?&FE60=14:*STLDISC
Line
4 loads the STLDISC, line 3 copies the contents of your master disk into
the Solidisk, lines 1 and 2 deal with formatting and copying blank diskettes in
drives 0 and 1. Start by *E.SPEC.L <RETURN>, place the master diskette in
drive o, press f9.
Remove
the master diskette.
Place
the blank diskettes into drives 0 and 1, press f0 and f1
alternatively
for maximum production speed... Anybody can produce more than 100 diskettes an
hour.
3.1.6.8.4 SOLIDISK
FOR MACHINE CODE PROGRAMMERS:
If
you have an ADE or MAS you can copy the ASM module(s) directly on to Solidisk.
This guarantees you a 70%+ time saving. If you don’t, you can use overlay
or Virtual Memory. To assemble very long programs one often uses an overlay
technique (see the Technical Manual; it has lots of pages on
overlay).
All
sections or modules to be assembled are on disk.. They must be under 14k bytes,
starting with line 10 and ending with PAGE=5000:RETURN.
You
will then enter the following program.:
REM
“ASS”
10
FOR pass=0 TO 2 STEP 2
20
*LOAD partr
30
PAGE=&1900:GOSUB10
40
*LOAD part2
50
PAGE= &1900:GOSUB10
60
REM repeat any number of the previous sequence for
other
‘parts’.
70
NEXT pass
*BUILD
then a !BOOT program:
PAGE=&500:CHAIN=”ASS”
The
STLDISC program is assembled using this technique. The Solidisk can assemble its
12k brother (in another Sideways RAM bank) in less than ‘5
seconds.
The
Virtual Memory VMP.90 approach is quite similar but much more suitable for just
longish programs.
It
basically allows you to type in 14k of extra assembly program without having to
set up an overlay.
See
section 3.3 for more details.
3.1.7 THE
WORD64 PROGRAM:
This
program increases the buffer size of Wordwise to as much as
64k.
3.1.7.1 WORD64
IS AN OVERLAY FOR WORDWISE 1.17:
WORD64
requires that Wordwise is present on your computer.
WORD64
uses the second disk as a text buffer.
WORD64
will execute all Wordwise commands except ‘Load.
text
to cursor’ (option 4).
3.1.7.2 RUNNING
WORD64 THE FIRST TIME:
Place
the SWR utility disk in drive 0. Enter:
CHAIN’
‘WORD64” <RETURN>
If
Wordwise is not present on your system there will be a warning
message.
If your Wordwise chip is in Socket 0 then do not switch off the computer but run
it a second time.
When
WW64, the code, is generated, the computer will prompt you to ‘Press any
key when ready’. Place a Solidisk diskette or the Language disk in drive 0
then press <RETURN>.
WW64
is different from your Wordwise chip only in the size of text it can
handle.
To
load WW64 enter *WW64 <RETURN>
Or
if the Solidisk is already set-up, press the function key
‘f5’.
3.1.7.3 WAITING
FOR A COMMAND
When
using WW64 for the first time you will be surprised that ‘you
have to wait five to ten seconds even for simple commands such as Preview text
(option 7) or Save text (option 1). The reason is that WW64 has to
update the buffer in drive before it can execute your command. The reward is
startling: preview text of any size, Search and replace, print text,
etc.
3.1.7.4
GETTING STARTED WITH WW64:
First
make a SAMPLE text.
LOAD
“MENU” <RETURN>
*SPOOL
:o.SAMPLE <RETURN>
RENUMBER
20000 <RETURN>
LIST
<RETURN>
*SPOOL
<RETURN>
*INFO
:o.SAMPLE <RETURN>
You
should see:
$.SAMPLE
0000 0000 B893
The
SAMPLE text is roughly 48.000 characters.
Press
the ‘f5’ function key.
Choose
Option 2. Answer “SAMPLE” to prompt.
You
should see created and deleted ‘WORD64T’ which will be the buffer
for WW64. Then the file ‘SAMPLE’ is copied to the Solidisk and the
activity ceases.
You
can press the <ESC> to go to ‘EDIT’ mode.
Now
go back to the Wordwise menu and choose option 7, preview text. The command line
will flash for a while and the text will be displayed continuously from
beginning to end. You can, for example, do a Search and Replace the word
‘&FE30’ by ‘ROMnumber’. You will be Surprised how
fast it can be. We use WW64 for editing Indexed Databases and for
writing MACRO basic programs.
You
can use WW64 without the 128k Solidisk but it is extremely tedious.
The Word64 program will be removed as soon as Solidisk’s own wordprocessor
is finished.
3.1.8 THE KEYBOARD PROGRAM:
Keyboard
is a music-making program. You call it up by *MUSIC. It will then turn the
computer keyboard to an electronic organ keyboard with the function keys used as
envelop characters. Use Caps-Control to change octaves, and use all letters from
Z to / to make up the lower keyboard. Letters Q to Cursor Down are for the upper
keyboard.
Pressing
the Escape key will stop the music.
Holding
the M key down while pressing the BREAK key will start the music
again.
The
Help menu is displayed with *Help Keyboard.
3.1.9 THE
FBACKUP PROGRAM
This
program allows you to use Sideways RAM to speed up disk backups when your
machine has a single disk drive.
To
start.
CHAIN
“FBACKUP” <RETURN>
You
just have to answer some simple questions, press RETURN if you find the default
option (displayed in brackets) is sensible. It is possible to backup an 8o-track
diskette with just two disk swaps.
3.1.10 THE QUICKY PROGRAM:
The
QUICKY (or QUICKCOPY) program is a rather different approach. While FBACKUP
performs a mass-copy of the diskette using as much Sideways RAM as there is
available, QUICKY lists out all the files on the disk and asks you to select
which one(s) you want to copy. The drawback of QUICKY is that it uses only
16-32k bytes of Sideways RAM. Its author promises a better version
soon.
To
start,
*QUICKLY
<RETURN>
*QUICKCOPY
<RETURN>
Quicky
is of Sideways Service ROM type but will answer to only
*QUICKCOPY
and *HELP
Quicky
will then display a list of files it can take in one go, asking you to say Yes
or No by pressing the ‘Y’ for Yes and any other key for
No.
Quicky
will then copy all the files you have selected and come back for more until the
disc is wholly scanned.
VOLUME 2 : THE SILEXICON
PROGRAM
3.2.1 THE SILEXICON PROGRAM
This
program spellchecks ASCII texts prepared with a wordprocessor. Scribe users will
have to wait for a different version.
3.2.1.1 A SPELLING CHECKER REQUIRING FAST DISC
ACCESS:
This
program is a VERY FAST Spelling Checker to out-perform all other spelling
checkers when used with the Solidisk. SILEXICON scans texts at more than 1,000
words a minute and is made from three components: SILEX the program itself, T1
the ‘tree table’ to find the word address in DIC, which is the
dictionary. Do not try to read what is in DIC as all words axe joined together
by five bit-letters making them much shorter and unreadable. The DIC must be
allowed to expand with new words and should be the last file on your SILEX
disk.
3.2.1.2 MAKING A SPELLING CHECKER
DISC:
Copy
to a blank formatted disk in order:
—L
—STLDISC
—SILEX
—T1
—DIC
3.2.1.3 GETTING STARTED
If
you do not have the 128k or 256k Solidisk, insert this disc in DRIVE 1 and enter
*:1.SILEX.
If
you do, enter *E.L <RETURN> then hit the space bar and when the screen is
clear, press function key ‘f4’.
The
SILEXICON screen will come up. The first thing Silexicon will do is checking
that both T1 and DIC are present on drive 1. It then asks for the text
filename.
You can insert the SWR utility disk in drive o and type in
help!.
Texts
are supposed to be in drive 0, but you can override this by entering :2.BIGTEXT
for example.
The
text will then be scanned. Each word is compared against the words held in DIC.
All mismatches are picked up. You are then requested to give your
verdict.
Three
situations will occur.
- The word is good although not found in DIC. Add it to DIC
(answer Y for
yes).
- The word is good but not to be added to DIG (answer P for
pass).
- The word is bad. Mark it for correction. (answer N for no
good).
If
you are unsure, press the space bar and Silexicon will display the line on which
the mismatch word is found.
Misspelt
words are marked by the hash sign ‘#‘. You can use your
wordprocessor to search and replace ‘#‘ with correctly spelt words.
Users of Wordwise can use f2 to move automatically to the next occurrence of
‘#‘. The DIC is automatically updated UPON COMPLETION with more
words as you use it. Always exit by option 3, QUIT as it will properly close T1
and DIC.
Note
3.2.1:
Although
DIC and T1 are updated with extra words but they are still on drive 1, the
Silicon drive. Should you require the updated DIC and T1, copy them to your
Spelling Checker disk. If you use several dictionaries you must keep one
diskette per DIC-T1 as they go together.
3.2.2 THE
STLRFS PROGRAM:
This
program puts a ROM header to any ordinary program so that it can be stored in
EPROM.
Please
make a few spare copies of the original STLRFS as you will see later on the
program is self-modifying.
3.2.2.1 STLRFS
IS A FILING SYSTEM
The
STLRFS is Solidisk RAM/ROM filing system. STLRFS is capable of LOAD and SAVE
programs in Basic or Machine Code in a Sideways ROM format suitable for making
Sideways ROM with any program less than 15k bytes.
Suppose
you want to put the ‘ROMIT’ program on the school’s BBC
computer and you have it written in Basic, just about 7k bytes (you know it by
printing TOP-PAGE). Let’s start by loading ‘ROMIT’ into the
machine followed by STLRFS. We then save ‘ROMIT’ into the Sideways
RAM bank that contains STLRFS but to make a Sideways copy of it we will have to
run the ‘MENU’ program.
LOAD
‘ROMIT’ <RETURN>
Place
a copy of the SWR UTILITY disk in drive o and enter:
*LOAD
STLRFS <RETURN>
<BREAK>
You
should see:
BBC
computer
STLRFS
BASIC
>
Now
enter:
OLD
<RETURN>
SAVE
‘ROMIT2’ <RETURN>
Now
reactivate the disk drives:
*DISC
<RETURN>
DO
NOT press the BREAK but:
CHAIN
“MENU” <RETURN>
You
should now see ‘STLRFS’ in Sideways RAM box ‘F’. Place a
disk with more than 16k spare space (or Volume 8) in drive o. Press the
‘@‘ key.
Give
box number ‘F’ to save STLRFS’ on your disk.
3.2.2.2
TESTING THE STLRFS:
Now
hit the BREAK key. You should see STLRFS again on the screen.
Enter:
LOAD
“ROMIT2” <RETURN> (or LOAD”” will do).
The
program will be instantly re-loaded; you can list it, run it, resave it.
etc.
Switch
off the computer. Switch it on again. Enter:
*STLRFS
<RETURN>
3.2.2.3 STLRFS
CAN PROVIDE LOW COST SOLUTIONS:
The
previous experiment can be repeated with any Basic or Machine Code program
(change LOAD to * LOAD, SAVE to *SAVE and CHAIN to *RUN) The result
is a ROM that can run itself without cassette recorder or disk drive.
To put it on EPROM you must first fix its real size. Place the last copy of
STLRFS (containing ROMIT2).
Enter:
*INFO
STLRFS <RETURN>
You
should see something like this:
STLRFS
008000 D9CD 4000 125
Then
enter:
*LOAD
STLRFS 2000 <RETURN>
*SAVE
ROMCOPY 2000 + 2000 D9CD 8000
<RETURN>
Now
connect the UVIPROM EPROM programmer to the user port, check that both 2
switches (5 and 21) are off, install a blank Eprom into the programming socket.
Place Volume 8 diskette into drive o and enter:
*UVIPROM
<RETURN>
Switch
on Vcc (switch 5). Enter:
*BLOW
ROMCOPY <RETURN>
That
is it.
3.2.3 SWR
UTILS
RUTILS
is a suite of utilities specially made for the Sideways RAM system. *HELP SWR
will list all the *commands available, mainly:
*RX
lists all ROMs and RAMs in your computer.
If
a name is preceded by *, the ROM is temporarily disabled by *RZAP (see below).
The ROM in purple is the one having RUTILS ‘glued’ to
it.
*RLOAD
<filename> <RAM number>, example: *RLOAD
TOOLKIT
E will load TIILKIT into bank E.
*RSAVE
<filename> <ROM-RAM number> <size 1, 2, 3 or 4> will save the
designated ROM/RAM without wiping any
program
in memory. The size of the wanted RAM/ROM is in multiples of 4k
bytes.
Ex:
*RSAVE DFS150 F 4: Save 16k in bank F to disk as DFS150.
*RZAP
<number>: disable any ROM/RAM in that socket or bank.
Ex.:
*RZAP) 1. Disable the ROM in socket no. 1.
*RRES
<number>: restore a zapped ROM/RAM.
*UNLANG
<number>: the designated ROM can no longer be selected as a
language.
*LANG
<number>: restore an UNLANGed ROM.
*EXCEPTION
<number>
*EXCEPTION
<number> <new name> allows you to rename temporarily a ROM that does
not follow the normal naming rule.
*LINK
<filename>: glue RUTILS to that file so that it does
not
take too much space on your disk.
*CLX:
clear all exceptions (new names attributed to odd chips).
*BYE
disables RUTILS.
3.2.4 THE
SWRDMA PROGRAM:
This
program shows you how to read data out of the Sideways RAM.
It
is fairly easy to write into Sideways RAM. You simply have to select the
Sideways RAM bank in B% (8-15 on the 128k., 14-15 on the 32k and only 15 on the
16k; the address in A% and use the basic ?, or $ operator to store your data. In
order to read it all back you will have to switch on the BASIC ROM out and the
selected Sideways RAM in. This is done by a small ten-line machine code found at
line number 30000 onwards.
Every
month there will be a prize for SWRDMA applications. This monthly prize is a
£100 cheque for whoever writes a program that will theoretically calculate
the biggest primary number in the shortest time using Sideways
RAM.
If
you think you have the answer, let us know.
VOLUME 3
Volume
3 deals with programming facilities offered by the Sideways RAM system. There
are ways to deal with oversized programs and ‘No room’ error
message. There is the overlay technique using the Silicon disk and a new tool:
Virtual Memory. This VMP is a more general approach that we hope the
educationalist will favour—it helps to structure the
programs.
If
you can divide a problem into a number of smaller problems and each can be
solved by a PROCEDURE or a FUNCTION or a SUBROUTINE then Virtual Memory
Processor and Macro Basic is for you.
The
Virtual Memory is an aid to Acorn BASIC 2 (1982). It stores a large proportion
of the program in Sideways RAM therefore reducing its size. Whenever Basic
cannot find a DEFPROC (DEFinition of PROCedure) or a DEFEN (DEFinition of a
FUNction) or a line number, an error will be generated and trapped by a VMP
which then reacts by copying the missing item from Sideways RAM to somewhere
between TOP and LOMEM, resets Basic pointers and returns control to
Basic.
Since
the system depends on the logical layout of the program, it encourages
structured programming. All the DEFPROCs and DEFFNs should be regrouped at the
end of the program, GOTOs and GOSUBs should be avoided as much as possible and
the number of nesting levels should be kept as low as possible.
Macro
Basic on the other hand is a program generator. Primarily it finds any missing
DEEPROCs and DEFFNs in your program, locates them somewhere in other programs
and appends them to your program. The result is a perfect program which will run
on any BBC computer even without Sideways RAM fitted.
Secondly,
Macro Basic translates MACROs into Basic statements. Macros are subroutines that
you create from PROCs, FNs, machine code or other programs. Macros need to be
defined once. The result can be used over and over again, like DEEPROCs and
DEFFNs with VMP.
One
could say that VMP is instant and volatile Macro Basic.
3.3.1 MACRO BASIC
Macro
Basic is the program that writes a new program using bits found in old
programs.
The
MACRO BASIC disk has the following programs:
MBASIC
(MACRO BASIC)
LINKEDT
(LINKER-EDITOR)
VMP1.0
(VIRTUAL MEMORY PROCESSOR VERSION 1.0)
VMP1.2
LIB10
(LIBRARY OF PROCEDURES)
LIB30
(MORE LIBRARY)
LIB
(SAMPLE LIBRARY)
TS100
(SAMPLE MACRO BASIC PROGRAM, which is not
different
from any other program but cannot run without
MBASIC
or VMP)
TV100
(SAMPLE VMP PROGRAM)
TB100
(SAMPLE BASIC PROGRAM AS GENERATED BY
MBASIC)
M.VIRTUAL
(Sample Macro file)
3.3.1.1 SOURCE PROGRAM FORMAT:
There
is a sample program on the disc. ‘TS100’ (Test, Source, 100 passes).
Load it and list it.
You
will notice that line 60 reads: 60 PROCabc. There is no
DEFPROCabc
in this program. The same thing happens at line 70:
70
PROCghk, no DEFPROCghk in sight.
So
that the Source File format is the same as any Basic program except that
DEFPROCs and DEFFNs are allowed to be missing.
3.3.1.2
LIBRARY FILE FORMAT:
Load
in the ‘LIB program and list it. You will see that DEFPROCabc, def and ghk
are all in LIB.
So
the library file format is the same as any Basic program, complete with DEPPROCs
and DEFFNs. This explains why ANY program can be a LIBRARY, as far as it
contains some useful DEFinitions.
3.3.1.3 MACRO BASIC IN ACTION:
Now
enter:
CHAIN
“MBASIC” <RETURN>
The
computer expects a filename:
‘Source
filename, please? . . . Type in:
TS100
<RETURN>
‘Output
filename, please? . . . Type in:
TB100
<RETURN>
‘>>WARNING:
file TB100present< <’
‘Automatic
LinkEdit of program? . . . Type in (for yes)
Y
<RETURN>
‘Library
name (/ to end) . Type in:
LIB
<RETURN>
Library
name (/ to end) . . . Type in:
/ <RETURN>
‘Simple
line renumbering? . . . Type in:
Y
<RETURN>
‘Automatic
run of output program? . . . Type in:
Y
<RETURN>
In
less than five seconds, MBASIC (and LINKEDT) generates the program and runs it
for you. The copy of the generated program is ‘TB100’. It will run
perfectly on any BBC computer, even without Sideways RAM.
List
‘TB100’. You will find that ‘TB100’ is composed of
‘TS100’ and the missing ‘DEFs’ borrowed from
‘LIB.
3.3.1.4 MACRO
BASIC AND LINK. EDITOR FOR THE TECHNICALLY MINDED
Macro
Basic scans the ‘Source Program’ or ‘Macro file’ and
translates all MACROs (see below) and text into a Basic program. Macro Basic is
flexible enough to accept text files produced by a wordprocessor as Source
files. Users of Scribe and View please note that Text Files must be spooled to
disk to strip all control
characters
related to the particular wordprocessor you are using. Examples of Macros are
illustrated in the M.VIRTUAL file.
The
previous ‘TS100’ is a trivial example as there is no ‘Macro
present.
Usually
automatic link-edit is assumed. After generating the program from the
‘Source’ MBASIC repetitively calls ‘LINKEDT’ to scan the
librar(ies) to pickup any DEFPROC or DEFFN that are still missing. For example,
although PROCdef was not called in the Source program, it is called by PROCabc.
So LINKEDT must scan the output program until it is satisfied that all missing
‘cues’ are found.
How
to write your own Macros is explained in the Technical Manual. It is beyond the
scope of this Manual. Solidisk Support Service will attempt to build up a
library of programs, subroutines, DEFPROC, DEFFNs, etc., for the BBC computer).
Instead of typing DEFPROCs and DEFFNs, you may just leave it to MACRO BASIC and
Solidisk program database.
But
there is more to it: if the program size exceeds 24k it won’t fit into any
BBC computer You will then need VMP, the Virtual Memory
Processor.
3.3.2 SOLIDISK VMP.90:
Solidisk
Virtual Memory Processor version .90 is the simplest answer to the ‘No
room’ error message.
Here
are the steps to add the Virtual Memory facility:
1) Load
your program.
2) Add
one extra line to your program:
o
*VMP <RETURN>
3) Save
the program.
- AN EXAMPLE WILL MAKE IT
CLEARER:
The
following example will make it clearer to you:
Load
in the ‘MENU’ program:
LOAD
”MENU” <RETURN>
Add
one line to it:
o *VMP
<RETURN>
Save
the new MENU program under the new filename
NWMENU
SAVE
“NWMENU” <RETURN>
Load
into Sideways RAM to VMP.90:
*VMP.90
<RETURN>
OLD
<RETURN>
RUN
<RETURN>
You
will see that functionally nothing has changed.
Press
the <ESCAPE> key. Enter:
LIST
<RETURN>
You
will see that the NWMENU program is much shorter than the MENU
program.
You
can therefore add extra features to the program.
3.3.2.1 THE LOMEM QUESTION:
When
*VMP is issued, the VMP.90 proceeds as follows:
1)
It scans the program from PAGE to TOP looking for the token DEF (&DD). The
line before the first DEF is found will be marked.
VMP
will copy all the lines after this point into Sideways RAM. TOP is then lowered
accordingly.
2)
It sets LOMEM=NEWTOP + 1024. The space put aside (1024 bytes from NEWTOP to
LOMEM) will belong to the VMP.
3)
It intercepts the BREAK instruction vector (&0201) to interpret any error
message.
Only
two errors will be handled directly by VMP.90: DEF missing (error &1D, No
such PROC/FN and error &29, No such line). VMP will find the missing PROC/FN
or the line and pass control back to BASIC.
3)
VMP returns to BASIC.
The
overall effect is that your program will gain as much room as the VMP can take
MINUS 1k bytes.
The
VMP.90 can accept only 14k bytes.
The
maximum saving is therefore 13k bytes.
3.3.2.2 HOW VMP.90 WORKS:
Whenever
a PROC or a FN is needed, BASIC looks for the beginning of the DEFPROC or DEFFN.
If the DEFPROC in question cannot be found, Basic will then signal the error,
which is trapped by VMP. VMP scans its store, finds the DEFPROC or DEFFN, copies
it into its workspace (between TOP and LOMEM), loads BASIC pointers with the
appropriate values and jumps back to BASIC.
VMP
is very fast: it does all the previous steps in 2 milliseconds on average, as
demonstrated in the ‘TV100’ program.
VMP
deals similarly with GOTO and GOSUB. It finds the missing lines, copies a block
of lines comprising the missing line to its workspace and goes back to
BASIC.
3.3.2.3 WHERE
IN THE WORKSPACE DOES THE VMP COPY
THE
MISSING ‘DEF’?
VMP
divides the program into blocks separated by the lines containing
‘DEF’.
The
VMP puts the requested ‘DEF’ just ABOVE the actual block that
requests the ‘DEF’. This ensures that nested GOTO, GOSUB and other
items will run properly while keeping its workspace as small as possible. So if
there is a line like:
1000
PROCa :PROCb.
VMP
will put DEFPROCa at TOP, get BASIC to execute it. When BASIC has finished with
PROCa, VMP will load DEFPROCb at TOP and get BASIC to execute it. But if PROCa
calls PROGc, VMP will load PROCc as above, PROCa. More room will be needed that
before.
3.3.2.4 REDEFINE LOMEM:
In
practical use, LOMEM will need to be redefined immediately after *VMP. Some of
the reasons are:
1) You
need to accommodate some machine code.
2) You
need to increase the VMP workspace as provision for possible
overflow.
3) You
want more room.
To
do so, estimate the maximum amount of RAM you can spare, for example 3000 bytes.
Add:
1
LOMEM=TOP+3000.
Important:
NEVER
EDIT OR SAVE ANY PROGRAM THAT HAS
BEEN
RUN
THE
LARGEST PART OF THE PROGRAMME WILL HAVE BEEN DELETED
As
the VMP will delete the largest part of your program to make room, if you save a
program that has been run you may find that you replace a fully working 16k
program by just the first few lines.
RELOAD
THE PROGRAM FROM DISC BEFORE EDITING
3.3.2.5 WHERE TO PUT YOUR MACHINE
CODE?
Machine
code assembled to fixed (known) locations or protected by an array (such as DIM
Q% 100: P%=Q%) do not need to be altered.
Machine
code part of a basic program assembled using TOP as program, counter MUST be
given a new value, related to LOMEM or other variables such as M% using DIM
M%500, for example.
3.3.2.6 HOW
TO ORGANISE YOUR PROGRAMS TO USE VMP AT ITS BEST:
1) Keep
the depth of any nesting as small as possible even if you have to add some extra
lines.
2) Write
in order: main program, subroutines, DEFPROCs and DEFNs that do not call any
other PROC and FN, machine code assembly and text.
3) Prefer
VMP1.0 for programs using a lot of machine code assembly.
4) Do
not leave any space between the words DEE and PROC:
DEFPROC
is legal, DEF PROC is not.
3.3.2.7 DO NOT TRY VMP.90 ON BEEBUG
MASTERFILE:
Many
of you will be tempted to use VMP.90 to run BEEBUG Masterfile in order to get
more free memory. It is not possible with VMP.90. The reason is as MF21 is 20k
long, VMP.90 can only take the bottom 14k, leaving 6k to the Basic RAM. It would
run perfectly if some PROCs calling other PROCs were
not
located in the first 6k. The only ‘fix’ will be a MP32 using two
Sideways RAM banks as opposed to one. The other solution is using VMP1.2 with
Solidisk. A few of our programmers are able to relocate some Masterfile PROCs to
get 1200 bytes free with it, but the method is too complex to go into in this
manual.
3.3.2.8 THE VMP.90 and VMP1.0 SOURCE
CODE:
The
source code for both programs is included for possible improvements. Solidisk
Software Support will give the best support towards developing both versions
even further to cover ‘No such variable’ and ‘Array too
large’. Any user interested in this work should contact the Software
Support Service immediately.
3.3.3 THE STOCK CONTROL PROGRAM
This
program illustrates the use of VMP.90 to increase the possible number of stock
items that the program can handle.
To
start,
CHAIN
“SC” <RETURN>
You
will be requested to give your name and the date which will be logged as
‘last user’. All options are menu driven, so simply answer to the
prompts. Usually you start by loading a STOCK file. There is also a sample stock
file called ‘STOCK’. So load stock first, then ask for an
‘Evaluation Report’.
You
can create new stock files for various suppliers. Ask for price list, update
stock situations, etc.
VOLUME 4 : S/D
3.4.1 SOLIDISK DATAFILE:
Solidisk
Datafile is a general database management program.
To
start, place Volume 4 disk in drive 0 and enter:
*E.!SD
<RETURN>
After
reading the key setting (see below), hit the space bar. When the screen is
clear, press the function key ‘f0’.
As
with all databases you are prompted with a series of questions —first the
date, then the password a which is 1234 on the
Volume
4 diskette.
So
let’s start by:
SOLIDISK
DATAFILE
Does
file exist on DISC Y/N
Answer
‘Y’,
Today’s
date?
Answer
Day-Day (space) Month-Month (space)
Year-Year
<RETURN>, example:
10
1 84 <RETURN>
You
should see:
Mm=19553
SOLIDISK
DATAFILE
FILES:
......... D.SAMPLE
Enter
filename required:
Answer
with ‘SAMPLE <RETURN>
Password?
Answer
with ‘1234 <RETURN>’
(This
password can be modified later).
Now
you will be presented with the main Menu; there are 11 options in
all.
Choose
‘2’ first.
You
should see:
FIELDS:
1)
Name
2) Surname
3) etc.
No
of FIELDS required:
Answer
with 9 as this is the maximum number of fields that have been created with this
datafile.
If
you answer with a smaller number you will be asked to supply your
selection.
Is
print-out required:
Answer
with ‘N’ to get only screen display.
You
can browse quickly through the datafile. Hold down the space bar to
‘freeze’ the record or RETURN to stop.
Escape
will return you to the main Menu. Once you have seen the datafile through I am
sure you will be able to use all the other options as most of them can be
operated quite intuitively.
3.5
THE SILEXIGEN PROGRAM
The
Silexicon package consists of three diskettes. Each contains the Silex program,
the Silexigen, Dictionary Generatory program and a specially compiled
Dictionary/T1. The dictionaries are English, French and German. There will be
other languages later on.
3.5.1 RUNNING
THE SILEXIGEN PROGRAM:
The
Silexigen (SIGEN on the disk) is capable of making a dictionary from a
wordprocessor text.
First,
use View or Wordwise to enter the new dictionary or addition to the other
dictionary.
Place
Volume 4 disk in drive 0, enter:
*E.L.
<RETURN>
Then
hit the space bar to set up the Solidisk as usual.
*COPY
01 SIGEN <RETURN>
Place
the Silexicon disc containing, for example, the Swahili dictionary that you want
to add new words to in drive 0.
Enter:
*COPY
01 T1 <RETURN>
*COPY
01 DIC <RETURN>
Now
place the disk containing the additional text into drive 0 and
enter:
*:1.SIGEN
<RETURN>
You
should see the SILEXIGEN screen and will be requested to enter the filename of
the additional text.
Please
type in the filename, for example:
SWA-Z
<RETURN>
Leave
it running until it stops.
Press
key ‘3’ to quit Silexigen.
Now
place the original disk containing your Swahili dictionary back in drive 0 and
enter:
*COPY
01 T1 <RETURN>
*COPY
10 DIC <RETURN>
Please
make plenty of backups of your master disks before adding new words to the
dictionary as these can be very long files therefore much exposed to disk
corruption. Check the new dictionary out before copying it to your master
disk.
VOLUME
8 : SOFTWARE DEVELOPMENT TOOLS:
SOLIMON,
SOLITRACE, 65C02 UVIPROM, SPRITE AND DEFINE
3.8.1 THE SOLIMON PROGRAM:
This
program is a very fine machine code monitor.
Solimon
is of little use for debugging ordinary Basic programs.
For
that a Basic TOOLKIT will be available later on.
If
you program in machine code you will soon discover that Solimon is simply one of
the best tools around.
To
start, place the Volume 8 disk in drive o and enter:
*SOLIMON
<RETURN>
Solimon
is now loaded into Sideways RAM 15. If you are loading Solimon from the MENU
program please note that the actual version of Solimon will not operate in any
other Sideways RAM bank than 15.
BBC
computer
Solimon
Acorn
DFS
BASIC
>
Once
loaded, Solimon will work as a language, i.e. similar to Basic, View or
Beebcalc. To evoke Solimon, enter:
*SOLIMON
<RETURN>
You
should see the command status panel.
The
screen is then divided into two parts. the top part is the status panel, the
bottom part is free and destined to run your program while debugging it with
Solimon.
3.8.1.1 COMMANDS AVAILABLE IN
SOLIMON
Now
that Solimon has taken over from Basic (you can return to Basic any time by
entering *BASIC), press:
?
This
command will display all available commands in Solimon and their single letter
commands.
They
are:
- D for disassembler, D 0C00 0CFF will disassemble the code
from &0000 to &0CFF.
- You will notice that all numbers (databytes or addresses) are
typed in or printed out in HEX.
- L for Hex dump; L 8000 BFFF will dump any selected Sideways
ROM. Again all numbers are in hex. An ASCII dump is also provided.
- // Toggle printer on/off, to obtain a hard copy of
anything printed on the screen.
- H for string hunt (search). H 1900 6C00 Hello <RETURN>
will locate Hello in memory and print out ‘found at: 2345
etc.’
- I for fill memory. I 5000 6000 FF will put ‘FF’
in every location between 5000 and 6000 (inclusive).
- F for byte search. If you have selected the DFS as Sideways
ROM with the ‘!’ command, F 8000 C000 80,FE <RETURN> will find
out where the DFS reads or writes to the FDC command register.
- * for OC commands. *BASIC <RETURN> will exit from
Solimon.
- Q Quit Solimon and returning to Basic.
- T Test subroutine. T 0C00 does a JSR to 0C00 so to check it
out (if it crashes, chances are that the machine won’t hang).
- S for single step. S 0C00 will single step the code starting
at this location. Space bar steps forward, escape returns to command
mode.
- B sets breakpoint, B 0C50 sets breakpoint at 0C50. If a T
(test) command is issued, it will exit at the breakpoint.
- R runs a program. R 0C00 performs a JMP to the specified
location in memory.
- M moves a block of memory. For example: M 8000 9FFF 2000 will
move your selected Sideways ROM down to normal RAM so that you can save
it.
- W sets panel. You will notice the row of numbers under the
header. Simply enter W and the new panel you wish to set.
- U clears previously set breakpoints.
- ! selects Sideways ROM/RAM sockets. It is worth mentioning
that breakpoints can also be set in Sideways ROM or RAM. Remember the display of
the MENU program so that you
can
select
the correct ROM. As a rule, in non-Sideways RAM machines, the leftmost ROM
socket is !C, the rightmost is IF. In Sideways RAM machines the ROM sockets are
10 to “2 from left to right; “3 to !E are all in Sideways
RAM. To be sure:
D
8000 <RETURN>, disassemble the beginning of the ROM so that you can read
the ROM title.
- ‘? Help’ brings up the Info help
message.
- E edits memory location; E 1900 <RETURN> prints out the
actual value. Press RETURN if you don’t want to modify it; enter a new HEX
number if wanted. Escape will return you to the panel.
- % spools disassembler code to disk for
word-processing.
3.8.2 THE 65002 ASSEMBLER:
SOLIDISK
65C02 SYSTEM FOR BBC MICROCOMPUTER
Two
programs are included in this package and the user will need to have BASIC 2 for
both of them. The presence of BASIC 2 is established by typing in REPORT and
pressing RETURN. If the date on the copyright message is 1982 then you have
BASIC 2 in your machine. Other BASICs are not at present compatible with this
system.
The
first of these is the CO2ASMB program and the second is the PATCH program
courtesy of Simon Taylor and Bob Watford.
The CO2ASMB program
The
CO2ASMB program is an overlay for BASIC 2 to facilitate machine code assembly
for the Rockwell 65C02 microprocessor and indeed all of the current 65 series,
including single chip microcontrollers and emulators. It even includes the
unsigned multiply (MUL) which is used on the available dual processor
(65C29).
The
65C02 is basically an upgraded version of the old 6502 but with a few
improvements. These include:
(i) 12
new instructions for a total of 68
(ii) 59
new opcodes for a total of 210
(iii)
Two new addressing modes
(iv)
Lower power consumption (4ma/Mhz)
Using
the new assembler
The
assembler needs at least 16k Sideways RAM, BASIC 2 and the MENU, TEST and
CO2ASMB programs on disk.
To
run the program type in CHAIN’ ‘CO2ASMB” followed by the
return key.
As
the program runs it first confirms that BASIC 2 is in fact resident in your BBC.
It then copies it across to Sideways RAM and proceeds to run the overlay to
enhance the BASIC assembler. Upon completion of the process a message is
displayed on the screen to show that the overlay is finished.
When
the program has finished running, the new assembler will identify itself as
65C02 on the screen in the place where BASIC would normally
appear.
Later
on, the 65C02 assembler can be evoked simply by
*65C02
<RETURN>.
You
now have an upgraded assembler overlayed on the original BASIC that retains
nearly all of the original functions of BASIC 2 except for the trigonometrical
and logarithmic functions which would not usually be required when assembling
machine code anyway. Hence the assembler retains the powerful editing and
assembling capacity of the BASIC but with the addition of the new 65C02 command
set and a further Pseudo operation (RES).
This
Pseudo Op (Syntax:RES xx). Where xx is a number or variable of a value less than
256) will reserve a specified number cf bytes in the assembled code which may
then be used for any required purpose.
For
example: RES&10 will reserve 16 bytes from the current value of P% to P% +
15 and increment P% accordingly.
Another
improvement over BASIC is that now all errors are suppressed on OPTO,2,4 and 5,
meaning no more out of range errors when assembling using 0%.
When
using this assembler for other types of 65 series processors care may need to be
taken not to use codes that are not valid on that particular processor. So it is
recommended that the appropriate programming manual is carefully studied to
avoid unnecessary debugging.
General information
As
previously mentioned there are 12 new instructions and a total of 59 new
opcodes. Please note, however, that not all of these commands are available on
the GTE 6502 at present used in the Acorn’s TUBE second processor. The
missing instructions are as follows: TRB, TSB RMB, SMB, BBR and
BBS.
It
should also be noted that this assembler is not compatible with the undocumented
commands on the 6502 with the exception of the STZ absolute command (opcode
&9C) and also that the software which uses these commands will almost
certainly not run on the 65C02.
There
is also one more command incorporated into the assembler which, as previously
mentioned, is only implemented on the dual 65C29 processor and 65C00/21
microcomputer. This is the unsigned multiply command (mnemonic MUL) which
multiplies together the A and Y registers and then places the result back in the
same registers with the MSB in A and the LSB in Y. The time taken for this
instruction is 10 machine cycles.
New
Addressing modes
Added to the old set of instructions are a few new
addressing modes and these are documented below. Those that now support Zero
page indirect addressing are:
Mnemonic Bytes Opcode Cycles Syntax
ADC 2 72 5TM ADC(ZP)
AND 2 32 5 AND(ZP)
CMP 2 D2 5 CMP(ZP)
EOR 2 52 5 EOR(ZP)
LDA 2 B2 5 LDA(ZP)
ORA 2 12 5 ORA(ZP)
SBC 2 F2 5TM SBC(ZP)
STA 2 92 5 STA(ZP)
TM
6 in decimal mode. ZP = Zero Page address
In the zero page indirect mode the second byte of the
instruction points to the zero page location that holds the effective (i6 bit)
address. Therefore an instruction such as LDA ( &8o) would take the
information in &8o and &81 as a i6-bit address and load the accumulator
from the new address.
The BIT command has three new addressing modes as
follows:
Mode Bytes Opcode Cycles Syntax
Zero
page,X 2 34 4 BIT
ZP,X
Absolute,X 3 3C 4’ BITabs,X
Immediate 2 89 2 BIT
# imm
‘ 5 if page boundary
crossed
Z
= Zero Page address abs = 16 bit address imm = <255
The JMP command allows one more mode as
follows:
Mode Bytes Opcode Cycles Syntax
Indirect,X 3
7C 6 JMP(abs,X)
This is another totally new addressing mode and adds the X
register to the second and third bytes of the instruction to give the effective
address. The mode is useful for the implementation of jump
tables.
New instructions
The accumulator mode includes two new instructions as
follows:
Command Bytes Opcode Cycles Effect
INCA 1 1A 2 A=A+1
DEC A 1 3A 2 A—A—1
These are quite self-explanatory and also quite useful
instructions, so no further time will be spent on these.
One further branch instruction is added to the list. This is
the branch always and is an unconditional branch.
Command Bytes Opcode Cycles Syntax
BRA 2
80 3’ BRAnew
‘4
if page boundary crossed. New=PC—127 to PC+128
Four new stack processing operations are
included:
Command Bytes Opcode Cycles Syntax
PHX 1
DA 3 PHX
PHY 1 5A 3 PHY
PLX 1 FA 4 PLX
PLY 1 7A 4 PLY
PHX
and PHY push the X and Y registers on to the stack whereas PLX and PLY pull
these registers from the stack. This saves the need for a sequence like
PHA:TXA:PHA:TYA:PHA which can be replaced by PHA:PHX:PHY with a saving of four
machine cycles.
Another
very useful command is the Store Zero (STZ) which is allowed four addressing
modes as below:
Command Bytes Opcode Cycles Syntax
STZabsolute 3 9C 4 STZabs
STZabs,X 3 9E STZabs,X
STZ Zeropage 2 64 3 STZ ZP
STZ Zer.pg.,X 2 74 STZ ZP,X
This
command clears the contents of the location pointed to by the second and/or
third bytes of the instruction. In the indexed mode, though, the contents of the
X register are first added to the address before execution of the
instruction.
Bit Manipulation
Instructions
The
remainder of the new instruction set deals with bit manipulation and when used
effectively can save a considerable amount of code, and hence execution time,
over the basic 6502 code.
Set and Reset Memory Bit (SMB
RMB)
These
only support the Zero Page addressing mode and the bit to be operated on is
added to the highest four bits of the instructions base code. This bit is then
either set or reset depending on the instructions in use. The entire set
follows:
Command Bytes Opcode Cycles
RMB 6
ZP 2 67 5
RMB 7 ZP 2
77 5
SMB 0 ZP 2
87 5
SMB 1 ZP 2
97 5
SMB 2 ZP 2 A7 5
SMB 3
ZP 2 B7 5
SMB 4 ZP 2
C7 5
SMB 5 ZP 2 D7 5
SMB 6
ZP 2 E7 5
SMB 7 ZP 2 F7 5
These instructions perform in just one byte and five machine
cycles what would have previously requires six bytes in a similar sequence
to:
LDA&77:ORA#
&01:STA&77
and therefore help considerably towards developing compact
code when using flags in zero page memory.
Test and reset/test and set memory bits with accumulator
(TRB/TSB). This set of instructions allows both zero page and addressing modes
and set or reset the bits in memory according to the contents of the
accumulator. The Z flag is also set or reset depending on the previous contents
of the memory location as ANDed with the accumulator contents.
Command Bytes Opcode Cycles Syntax
TRB
zero page 2 14 5 TRE ZP
TRB
absolute 3 1C 6 TRBabs
TSB zero page 2 04 5 TSB
ZP
TSB absolute 3 0C 6 TWBabs
The final set of new instructions are the branch on bit set
and branch on bit reset commands (BBR BBS). These are three-byte commands with
the first byte containing the bit number to be tested and the command type. The
second byte contains the zero page location to be tested and the third byte is
the branch offset which must be in the range of -126 to + 129 from the
instructions address to be valid.
Command Bytes Opcodes Cycles
BBR 0
offset 3 0F 5’
BBR 1
offset 3 1F 5’
BBR 2
offset 3 2F 5’
BBR 3
offset 3 3F 5’
BBR 4
offset 3 4F 5’
BBR 5
offset 3 5F 5’
BBR 6
offset 3 6F 5’
BBR 7
offset 3 7F 5’
BBS 0
offset 3 8F 5’
BBS 1
offset 3 9F 5’
BBS 2
offset 3 AF 5’
BBS 3
offset 3 BF 5’
BBS 4
offset 3 CF 5’
BBS 5
offset 3 DF 5’
BBS 6
offset 3 EF 5’
BBS 7
offset 3 FF 5’
‘=6 cycles if page boundary
crossed
This completes the description of the new opcodes on the
65C02. There is, however, one point to note—that on the overlay a new
error message may be generated. This is BIT error and indicates that an attempt
has been made to do an operation on a bit with a number greater than
7.
It is also worth noting that the bit value may also be a
numeric variable as long as its value is 7 or less.
The PATCH Program
This
program requires no Sideways RAM but does, however, take up space in the user
memory. It has all the same facilities of the previous overlay type program
except for the loss of the RES pseudo op and the MUL unsigned multiply. It also
retains the full capabilities of the BASIC rom with no loss of maths
routines.
All
of the new commands in this program are implemented by the use of the OPT
command followed by a FU and the opcode mnemonic. All of the new opcodes need a
dummy argument (Z% is used in this case) because of the use of FN. All arguments
then required for assembly will go inside the brackets. In the example TEST is
used as a single byte or zero page address argument, and BIGTEST as an absolute
address argument.
There
now follows the complete PATCH program with the OPT FN
definitions:
>L.
100DIM
CODE% &100
110TEST=&12:BGTEST=&ABCD
120FORZ%=4
TO 7 STEP 3
1300%=CODE%:P%=&1000
140
[
150OPT
Z%
160OPT
FNBRA(Z%,TEST)
170OPT
FNORA(Z%,TEST)
180OPT
FNAND(Z%,TEST)
190OPT
FNEOR(Z%,TEST)
200OPT
FNADC(Z%,TEST)
210OPT
FNSTA(Z%,TEST)
220OPT
FNLDA(Z%,TEST)
230OPT
FNCMP (Z% ,TEST)
240OPT
FNSBC (Z%,TEST)
250.LABEL1
OPT FNTSB(Z%,TEST,
260OPT
FNTRB (Z%,TEST)
270OPT
FNBIT (Z%TEST)
280OPT
FNSTZ (Z%,TEST)
290OPT
FNSTZ (Z%,TEST)
300OPT
FNRMB(Z%,0,TEST)
310OPT
FNRMB(Z%,1,TEST)
320OPT
FNRMB(Z%,2,TEST)
330OPT
FNRMB(Z%,3,TEST)
340OPT
FNRMB(Z%,4,TEST)
350OPT
FNRMB(Z%,5,TEST)
360OPT
FNEMB(Z%,6,TEST)
370OPT
FNRMB(Z%,7,TEST)
380OPT
FNSMB (Z%,0,TEST)
390OPT
FNSMB(Z%,1,TEST)
400OPT
FNSMB(Z%,2,TEST)
410OPT
FNSMB(Z%,3,TEST)
420OPT
FNSMB(Z%,4,TEST)
430OPT
FNSMB(Z%,5,TEST)
440OPT
FNSMB(Z%,6,TEST)
450OPT
FNSMB (Z%,7,TEST)
460OPT
FNBITI (Z%,&AA)
470OPT
FNINCA(Z%)
480OPT
FNDECA(Z%)
490OPT
FNPHY(Z%)
500OPT
FNPLY(Z%)
510OPT
FNPHX(Z%)
520OPT
FNPLX(Z%)
530OPT
FNTSB(Z%,BGTEST)
540OPT
FNTRB (Z%,BGTEST)
550OPT
FNBIT(Z%,BGTEST)
560OPT
FNJMP (Z%,BGTEST)
570OPT
FNSTZ(Z%,BGTEST)
580OPT
FNSTZX(Z%,BGTEST)
590OPT
FNBBR(Z%,0,TEST,L2)
600.L2
OPT FNBBR(Z%,1,TEST,L3)
610.L3
OPT FNBBR(Z%,2,TEST,L4)
620.L4
OPT FNBBR(Z%,3,TEST,L5)
630.L5
OPT FNBBR(Z%,4,TEST,L6)
640.L6
OPT FNBBR(Z%,5,TEST,L7)
650.L7
OPT FNBBR(Z%,6,TEST,L8)
660.L8
OPT FNBBR(Z%.7,TEST,L9)
670.L9
OPT FNBBS(Z%,0,TEST,L10)
680.L10
OPT FNBBS(Z%,1,TEST,L11)
690.L11
OPT FNBBS(Z%,2,TEST,L12)
700.L12
OPT FNBBS(Z%,3,TEST,L13)
710.L13
OPT FNBBS(Z%,4,TEST,L14)
720.L14
OPT FNBBS (Z%,5,TEST,L15)
730.L15
OPT FNBBS(Z%,6,TEST,L16)
740.L16
OPT FNBBS(Z%,7,TEST,L9)
750]
760NEXT
30000REM
START OF 65C02 FUNCTIONS
30001END
30002DEFFNBRA(opt%,where%)
30003[OPT
opt%:BNE where%:]
30004IFopt%
>3 0% ?—2 = &80 ELSEP%—2 = &80
30005=opt%
30006DEFFNBBS
(opt%,bit%,address%,where%)
30007
[OPT opt%:BNE where%:]
30008IFOpt%
>3 O%?-2=&8F+bit%*16:O%?o= (Q%?-1)-1:
O%?-1=address%:O%=O%+1
ELSEP%?-2=&8F+bit%*16:P%?o=(P%?-)-16:P%?-1=address%
30009P%=P%+1
300010=opt%
300011DEFFNBBR(opt%,bit%,address%,where%)
30012[OPT
opt%:BNE where%]
30013Fopt%
>3 O%?-2=&0F+bit%*16:O%?0=(O%?-1)-1: O%?-1=address%:O%=O%+1
ELSE%?-2=&0F+bit%*?0=(P%?-1)-1:P%-1=address%
30014P%=P%
+ 1
30015=opt%
30016DEFFNPHY
(opt%)
30017[OPT
opt%:EQUB &5A:]
30018=opt%
30019DEFFNPLY
(opt;)
30020[OPT
opt%:EQUB &7A:)
30021=opt%
3022DEFFNPHX
(opt%)
30023
[OPT opt%:EQUB &DA:]
30024
= opt%
30025DEFFNPLX
(opt%)
30026[OPT
opt%:EQUB &FA:]
30027
= opt%
30028DEFFNRMB
(opt%,bit%,address%)
30029
[OPT opt:EQUB bit%*16+&07 EQUB address%:]
30030=opt%
30031DEFFNSMB
(opt%,bit%,address%)
30032
[OPT opt%:7EQUB bit%*16+&87:EQUB address% :]
30033=opt%
30034DEFFNINCA
(opt%)
30035
[OPT opt%:EQUB &1A:]
30036=opt%
30037DEFFNDECA
(opt%)
30038[OPT
opt%:EQUB &3A:]
30039
= opt%
30040DEFFNTSB
(opt%,address%)
30041IFaddress%>&FF
[OPT opt% :EQUB &0C:EQUW address%:]
ELSE
[OPT opt%EQUB &04:EQUB address%:]
30042
=opt%
30043DEFFNTRB
(opt%,address%)
30044IFaddress%>&FF
[OPT opt% :EQUB &1C :EQUW address% :]
ELSE
[OPT opt%:EQUB &14EQUB address% :]
30045
= opt%
30046DEFFNSTZ
(opt%,address%)
30047IFaddress%>&FF
[OPT opt%:EQUB &96:EQUW address%:]
ELSE
[OPT opt%:EQUB &64:EQUB address%:]
30048=opt%
30049DEFFNSTZX
(opt%,address%)
30050IFaddress;>FF
[OPT opt%:EQUB &9E:EQUW address% :]
ELSE
[OPT opt% :EQUB &74 :EQUB address %:]
30051=opt%
30052DEFFNORA
(opt%,address%)
30053[OPT
opt%:EQUB &12EQUB address%:]
30054=opt%
30055DEFFNAND
(opt% ,address%)
300561 [OPT opt%:EQUB &32:EQUB
address%:]
30057=opt%
30058DEFFNEOR (opt%,address%)
30059 [OPT opt% :EQUB &52:EQUB address%
:]
30060=opt%
30061DEFFNADC (opt%,address%)
30062 [OPT opt%:EQUB &72:EQUB
address%:]
30063 =opt%
30064DEFFNSTA (opt%,address%)
30065 [OPT opt%:EQUB &92:EQUB
address%:]
30066=opt%
30067DEFFNLDA (opt%,address%)
30068 [OPT opt%:EQUB &B2:EQUB
address%:]
30069=opt%
30070DEFFNCMP (opt%,address%)
30071 [OPT opt%:EQUB &D2:EQUB
address%:]
30072=opt%
30073DEFFNSBC (opt%,address%)
30074 [OPT opt% EQUB &F2:EQUB
address%:]
30075=opt%
30076DEFFNJMP (opt%,address%)
30077 [OPT%:EQUB &76:EQUW address%:]
30078=opt%
30079DEFFNBIT (opt%,address%)
30080IFaddress%>&FF [OPT opt%:EQUB &3C:EQUW
address%:]
ELSE
[OPT opt%:EQUB &34:EQUB address % :]
30081=opt%
30082DEFFNBIT1 (opt%,bvte*)
30083 [OPT opt%:EQUB &89:EQUB byte%:]
30084=opt%
When developing code with this program it is only necessary
to use from line 30000 onwards as the preceding lines are purely for
demonstration purposes.
3.8.3 SOLITRACE
Solitrace
is an improved version of a commercially available TRACE program from Quasar
software. The beautifully presented Manual of the TRACE program is not available
to Solidisk Sideways RAM users, but those interested may contact Quasar
Software. A practical user guide is provided under the filename
MTRACE.
3.8.4 UVIPROM
1.0 AND SOLIDISK EMPROM PROGRAMMER
DISCLAIM:
IMPORTANT:
The Eprom Programmer is a simple device yet requiring great care and attention
in handling. In our experience mishandling happens with most Eprom programmer
users sooner or later.
We
hereby give notice that no claim whatsoever for any loss or consequential damage
to any software or equipment, including
the
Eprom programmer, will be entertained.
Under
all circumstances our responsibility will be restricted to the servicing, at
your cost, any damage caused to the Eprom programmer.
Eproms
as supplied by us or other reputable distributors are certified by the
manufacturers. They are not guaranteed otherwise than leaving our premises with
the usual caution for handling MOS devices. We do not accept any return for
replacement.
The
present notice is explicitly included in the conditions of sale of the Eproms
and Eprom programmer.
3.8.4.1 THE
UVIPROM PROGRAM
The
UVIPROM program is specially adapted to drive Solidisk Eprom programmer
(available as optional extra). It provides four commands:
*READ
<filename>
*BLOW
<filename>
*COMP
<filename>
*VIEW
<filename>
The
system is disk based although it would run from tape. The Uviprom program is a
Sideways ROM type software.
3.8.2.4 EPROM
AND EPROM PROGRAMMER
EPROM
(Erasable Programmable Read Only Memory) is the type of ICs that you install
into your Sideways ROM sockets. Its appearance is quite easy to recognise: it
has a glass window. The EPROMs are normally blank when you buy them from an
electronic computer distributor (such as Watford Electronics, Technomatics or
Semicomponents, to cite a few). The BBC computer can only read the EPROMs if
they are inserted into the Sideways ROM sockets but cannot write into them as
into Sideways RAM. To do so you will need a special hardware device capable of
generating:
1)
the correct programming voltage (21-22V);
- the correct programming pulse (50ms per byte);
This
is done by Solidisk Eprom Programmer.
3.8.4.3 PROGRAMMING
AN EPROM:
Here
are the steps to program (or ‘blow’) an EPROM:
1)
connect the Eprom Programmer to the user port;
2)
place a blank Eprom in the programming socket;
3)
enter *BLOW <filename> <RETURN>
Now
the details:
- CONNECTING THE EPROM PROGRAMMER
TO THE USER
PORT
Switch
off the computer and turn it over to expose the row of sockets under the
keyboard.
Connect
the 2o-pin IDC cable to the user port, situated between the printer port and the
1MHz port. Make sure that the ‘bump’ on the IDC it mating correctly
with the user port socket.
Notice
a 28-pin socket on the EPROM PROGRAMMER just above the ribbon cable; this is the
Programming Socket.
Power
on the computer.
There
are two LEDs (Electra-Luminescent Diodes), coloured red, on the EPROM
PROGRAMMER. The one nearest to the ribbon cable is labelled ‘5’ (for
5 volts)—the ‘Vcc’ indicator; the other one is labelled
‘21’ (for 21 volts)—the ‘Vpp’ indicator. Vcc is
also the ~v. supply to the Eprom Programmer, borrowed from the user port. Vpp is
the programming voltage supply generated by a switched mode power supply built
into the programmer.
IMPORTANT:
NO INSERTION OR REMOVAL IS ALLOWED WHEN EITHER LED IS ON! Permanent damage (pure
loss) will result from careless handling of Eprom devices.
Next
to the LEDs are two switches, one for Vcc next to the Vcc indicator, the other
is for the Vpp.
If
you are using the Eprom Programmer for the first time try these switches until
you are sure to understand how they work:
if
the switch is on, the LED will be lit; if the switch is off, the LED will go
off. Try them as many times as necessary.
Notice
the small hissing sound when Vpp is switched on: it is generated by the high
frequency going through the coil. The Vcc switch does not produce any
sound.
Note:
By experience we know that mishandling will sooner or later happen to most Eprom
Programmer users, so please pay attention to this device—simple but
capable of costing you money unnecessarily.
SWITCH
OFF BOTH SWITCHES
- READ AN EPROM ALREADY PROGRAMMED INTO
THE COMPUTER
Before
you ‘blow’ the first Eprom with the Eprom programmer, it is useful
to start by reading an EPROM already programmed and store it on to your
disk.
Connect
the Eprom Programmer as per section 3.8.4.3.
3.8.4.5.1 INSTALL
AN EPROM INTO THE PROGRAMMING SOCKET
Place
an EPROM that is already programmed into the programming socket. Ensure that pin
1 (top left-hand corner) of the EPROM is facing the ‘1’ sticker on
the Eprom programmer. If in doubt ring us for advice. The top of the EPROM has a
small notch. It should match the same notch on the programming socket. The
bottom of the Eprom is facing the ribbon cable.
3.8.4.5.2 RUNNING
THE UVIPROM PROGRAM:
Enter:
*UVIPROM
<RETURN>
The
screen should be cleared and you now see:
BBC
computer
UVIPROM
1.0
Acorn
DFS
BASIC
>
Enter:
*READ
DUMMY <RETURN>
Dummy
is one of the names that you can give to the Eprom being read.
You
should see:
>
>Press the BEAK key if Vcc is off< <
Press
the BREAK key, switch on Vcc (the one nearest to the ribbon
cable).
PRESS
THE BREAK KEY AGAIN
Now
re-enter:
*READ
DUMMY <RETURN>
The
previous exercise was devised to get you noticing the way the UVIPROM program
reminds you to switch on Vcc and how to react to this request.
As
Vcc is switched on, UVIPROM will start reading the Eprom right away. Your disk
should be whirring for a couple of seconds and then stops. You may
enter:
*DUMP
DUMMY <RETURN>
You
should recognise the EPROM that has been read by reading the copyright notice at
the beginning of the DUMMY file. UVIPROM will report disk error if there is any,
as usual. Especially, if no valid filename is given it will
report:
BAD
COMMAND
>
3.8.4.5 TESTING
A BLANK EPROM:
There
is no need to switch off the computer.
Switch
off Vcc.
With
a small screwdriver, remove the Eprom that was read.
Place
a blank Eprom into the programming socket.
Switch
on Vcc.
Enter:
*TEST
<RETURN>
You
should see:
OK
>
If
the blank test fails, the locations where it fails will be displayed. Press the
<ESCAPE> key to end the blank test.
3.8.4.6 PROGRAMMING AN EPROM
Suppose
that you have done the blank test to the Eprom in the programming socket. Now
you are ready to put program your first EPROM.
Suppose
the program you want to put on to the EPROM is called
‘FOREVER’.
Enter:
*BLOW
FOREVER <RETURN>
You
should hear the disk drive whirring for a couple of seconds, then the
prompt:
FILE
LENGTH &. . . . . . . , Program this Eprom (Y/N)?:
appears.
As
the Eprom programmer cannot distinguish between a 2764 and a 27128 EPROM,
although it can program both devices, it cannot take a decision; it asks you to
take it. Basically the answer is very simple: if the file length is &2ooo or
less you can put it on to either a 2764-35 or 27128-35 EPROM. If it is greater
than &2000 but smaller or equal to &4000, a 27128-35 will be
required.
Important:
Many programs saved with the MENU programs may show 4000 Hex as file length
whereas their true length is only 2000 Hex or less. Please correct this by
*LOADing it at 2000 and *SAVEing it again before blowing the
EPROM.
Example:
You have successfully created an NEWROM in Sideways RAM and saved it with the
MENU program.
*INFO
NEWROM <RETURN>
NEWROM
8ooo D9CD 4000 120
>
Now
enter:
*LOAD
NEWROM 2000 <RETURN>
*SAVE
NEWROM 2000 +2000 D9CD 8000
<RETURN>
So
if the EPROM is a suitable type, press Y
The
screen will be cleared and the prompt:
>SWITCH
ON VPP AND PRESS <RETURN><<
Do
as it says. Both LEDs must be lit before you press the <RETURN>
key.
The
programming sequence is now initiated. To keep your attention a hex dump of data
being programmed on to the Eprom is displayed. You can halt the programming
sequence by holding down both the <CONTROL> and the <SHIFT> keys.
Programming can be abandoned at -any time by pressing the <ESCAPE>
key.
When
the programming is terminated, a ‘beep’ will be sounded and you are
asked to switch off Vpp.
SWITCH
OFF Vpp.
Then
press the RETURN key.
3.8.4.7 COMPARE AN EPROM WITH THE
MASTER:
To
ensure that the programming of your EPROM is quite successful you can either
remove it and use it in one of the Sideways ROM sockets or compare it first
against the source file.
Enter:
*COMP
FOREVER <RETURN>
All
the display should be in green. Any mismatch found will be displayed in red. A
summary of all mismatches will be displayed at the end of the COMParison
sequence.
3.8.4.8 THE
VIEW COMMAND:
*VIEW
<filename> is a colourful version of *DUMP <filename>. It is
provided to examine data programs before you program your
EPROMs.
3.8.4.9 COMMAND SHORTFORM:
Once
you get used to the UVIPROM program, commands may be entered in short form with
a .‘ such as *BL., *V.,
*COM.,
*RE., etc.
*H.
U <RETURN> will show a summary of available commands.
3.8.4.10 UVIPROM
SOURCE CODE
The
program ‘UVP’ is a source code for the UVIPROM. It is included for
possible modification for yourself.
3.8.5 THE SPRITE PROGRAM:
This
program allows up to 50 SPRITES to be stored in Sideways RAM and printed
anywhere on the screen using the PLOT command.
Each
Sprite takes up 256 bytes and can be created using the DEFINE program or the
‘Rubber Band’ (available later).
The
easiest way to get to grips with this simple yet potentially great idea is to
run the ‘TEST’ program.
To
start:
*SPRITE
<RETURN>
CHAIN
“TEST” <RETURN>
Every
time you hit a key the test sprite will be printed at random location. The speed
is all right: 20ms to send a sprite anywhere you want.
It
is possible to move up to 6o sprites per television frame; more than what the
eyes can follow.
To
create your own sprites use the DEFINE program.
3.8.6 CHAIN “DEFINE”
<RETURN>
The
Define program displays a grid of the size you want, up to 24 x 24 pixels. Press
the cursor keys to move the cross hair over the chosen (enlarged) pixel and then
the colour number.
3.11 VOLUMES
11 TO 20 : THE SOURCE CODE
The
Source Code is the original material as it is sent to us by the authors of the
programs published in other volumes. They include authors’ own
annotations. You can not only modify these original programs to suit a
particular situation (such as running Silexicon with a single disk drive) but
also learn programming techniques from their authors, especially those of you
who want to write your own Sideways software.
We
are sure that this work will provoke interest in many users with regard to
programming in machine code.
Chapter
4: Solidisk Local Experts
4.1.1 GETTING
TO KNOW YOUR LOCAL EXPERT:
If you have any difficulty in fitting your Sideways RAM ring
the Sales Office and we will give you the address, telephone number and the most
suitable time to ring your nearest Solidisk local expert.
He will be able not only to sort out your hardware problems
but also, while you are with him, to give you some advice on the software
side.
Solidiak will pay his time spent with you, so don’t
worry about the extra cost.
At the present time Solidisk local experts will intervene
only if you have a hardware problem, NOT SOFTWARE PROBLEMS which must still be
referred to the Technical Department. In the near future Solidisk will extend
this software support service to the local network.
4.1.2 BECOMING
SOLIDISK LOCAL EXPERT:
If you feel you are capable of helping other Sideways RAM
users please write or ring us immediately.
To be eligible you must have BBC model B fitted with
Sideways RAM. a fine soldering iron, a tester and good experience with the BBC
hardware and software.
You are expected to work more than five hours a week
(evenings or Saturdays) and should earn more than £20 extra cash every
week.
At present time the general terms for a Solidisk local
expert include payment for fitting service and special discount on diskettes and
EPROMs which we expect the caller to buy from you.
1) The
basic rate for fitting a Sideways RAM or Solidisk DDFS is £3 per BBC
computer—paid at the end of each month.
2) The
basic discount on EPROMs and DISKETTES is 15% for any quantity.
- 10% discount for your own equipment (disk drives, printers.
monitors, prom Programmers, Eprom Erasers,
etc.).
So
if you are interested please ring us as soon as possible.
4.3 WRITING
TO US:
TOBY MAINWARING has been appointed as supervisor of the
local help network and editor of the bi-monthly Solidisk
Newsletter.
So please write to him and talk about your problems,
comments, suggestions, etc.
Send
to him any programs, routines, discoveries, hints and tips that you want to
share with other users. The address is:
Mr.
T. MAINWARING
Solidisk
Technology Ltd.
17
Sweyne Avenue
Southend-on-Sea
Essex
SS2 6JQ
ACKNOWLEDGEMENTS
We would like to thank all those who have contributed
towards our software support in general and also to this manual. Any suggestions
and constructive comments are always welcome and we look forward to valuable
participation in the future.
If you intend to send in programs, please remember: the
support service is not rich enough to pay four programmers doing the same job.
It is in the interest of all users that we should create different software and
therefore talk to the support service. Another point is that it is so simple to
turn any program into Sideways RAM program which will then have much faster
loading and ease of use.
Please carefully label any disk you send in with your names
address, the name of the program, and include a covering letter. Please allow
three weeks for acknowledgement.
Thank you again for the numerous letters received every day
by the service. We are considering introducing a “FREE AD”
service.
Solidisk will pay for a one-page advert in one of the
popular BBC magazines containing free advertisements of programs not published
by the Service because they are too expensive to be added to the Service or they
are not of interest to the majority of Sideways RAM users.
Authors can then advertise their programs at no cost. We
shall, however, impose the condition that no program diskette will cost more
than £5 to any Solidisk Sideways RAM user and adequate documentation and
service must be provided.