1
. How to use this manual
If
you have purchased a disk interface from Opus Supplies Ltd., and if the
interface
has
not been fitted into your computer by a dealer then look at the
fitting
instructions
in chapter 12, read and follow them carefully. If you do not
feel
competent
to follow the instructions then contact your local dealer for
assistance.
If
you have never used disc drives before you should read chapters 2 and 3
which
explain
how to use them, and how to look after your discs. You should then
read
through
chapter 4, carrying out the exercises given, to help familiarise you
with
your
new equipment.
Chapter
5 provides a detailed explanation of the commands available in the
Acorn
DIFS,
and should be read by users of Opus DDOS and CHALLENGER as
these
systems
include all the commands provided by the Acorn DFS, (and many
more
besides!)
The
extensions provided by Opus DDOS are explained in chapter 6, it
is
suggested
that new users should read chapter 5 before proceding to the
extra
facilities
provided by Opus DDOS. Users of the CHALLENGER should also read
this
chapter, since all facilities provided by DDOS are available to users of
the
CHALLENGER.
CHALLENGER
ADDENDUM
You
will find that most protected programmes will boot immediately on
your
Challenger.
However
for some software: ie. ELITE, it is necessary for the disc
catalogue
to
be loaded at EOO.
To
enable these programmes to load you should type the following:
*ENABLE
CAT (RETURN)
You
will then be able to boot the programme as normal.
1
2. Disc
drives and discs
Installing
a disc drive unit (Acorn DFS and Opus DDOS)
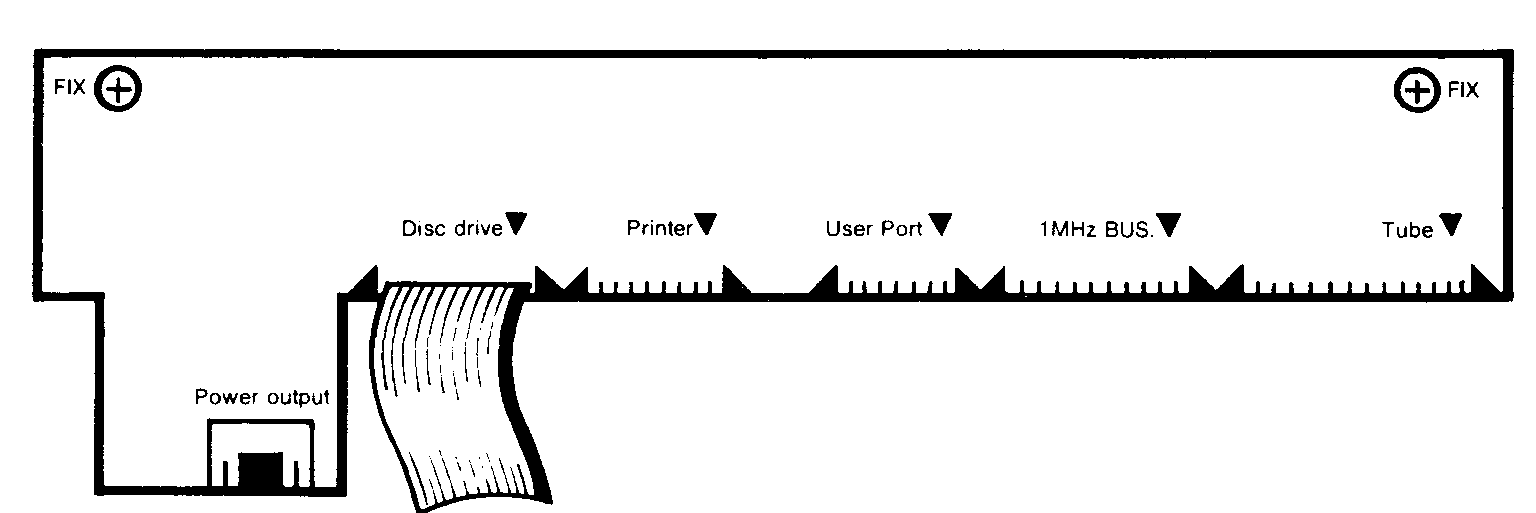
The
BBC microcomputer can be fitted with one or two disc drives. When two
are
fitted,
they are usually in the form of a dual unit in a single casing.
A
disc drive is a very simple device to look at. It is a long metallic box with
two
cables
attached to it. At the front are one or two 'letter-boxes' through which
the
discs
will be 'posted'. The letter-boxes have doors which are opened and
closed
either
by a lever, which turns through 90 degrees, or a flap.
There
may also be an indicator light on each drive which lights when the drive is
in
use.
At the back of the unit, there may be an on-off switch, of which more
later.
Of
the two cables, one is a flat ribbon cable fitted with a flat 34-way plug, which
will
connect
to the BBC. The other is a power cable. If the disc drives have their
own
power
supply, then you will need to fit an appropriate mains plug to this lead,
with
a
3-Amp fuse. If the disc drives are to be powered from the BBC, the cable
will
already
be fitted with a 6-way connector.
To
fit the drive unit, turn off and unplug the BBC. Lift up the
computer,
underneath
you will observe a number of label led sockets. If you have an
Opus
RAMDISC insert the 34-way plug into the socket marked 1 MHz
Bus',
if you are using Acorn DFS or Opus DDOS insert the 34-way plug
into
the socket marked 'Disc drive'. Normally, this is possible in only
one
way
because the plug has a small lug on top which must fit into a
corresponding
notch in the socket. Alternatively, the ribbon cable will have
a
red stripe down one side, and the plug should be aligned so that
this
stripe
goes to the side of the socket marked by an arrow head.
If
there is a 6-way power connector, this should be connected to the
socket
marked
'Auxiliary power socket'. It is not possible to connect this plug in other
than
the
correct orientation. If the drive unit has its own power supply, plug in the
mains
power
lead.
The
drive unit should be positioned on a firm horizontal surface. Open the
doors
and
remove any cardboard transit packing slips. Keep these for possible
future
use.
Close
the doors again. Power on the BBC and the drive unit. Nothing
should
happen
at this stage. If the indicator lights do come on or the drive
makes
unexpected
noises, either the drive has been incorrectly connected to the BBC,
or
the
disc filing system upgrade has been incorrectly fitted in the BBC. Turn off
the
BBC
and the disc drive and recheck all steps, if necessary refitting the
disc
upgrade.
If
all is quiet, type *. (RETURN) on the BBC keyboard. The drive (the upper drive
of
a
dual drive unit) should now spin, making a constant whirr, and the indicator
light
should
be on. If not, check the switch on the back of the drive is on. Check
the
mains
connection or the 6-way power connector. Check the ribbon cable
connection.
To
stop the drive spinning, press the BREAK key. The drive unit is now
installed
and
ready for action, but before you start using it you need to know a little
about
disc
drives and floppy discs.
Types
of disc drives
Not
only do disc drives come singly or in pairs, but each drive can be either
single
or
double sided (which means that they can use just one or both sides of a
floppy
disc).
The numbering of the disc drives on the BBC reflects these
combinations.
A
disc in a single, single-sided drive is said to be on drive
0. In a single
double-
sided
drive, the upper side of the disc is on drive 0 and the lower side on drive
2.
With
dual drives, a disc in the upper drive is on drive 0
or 2, as above. A disc in
the
lower
drive is on drive 1 (upper side) and drive 3 (lower side).
A
disc drive can be either a 40-track or an 80-track drive, and in some cases,
can
be
switchable between these modes (by the 40-80 switch at the back of the
drive).
An
80-track drive can store twice as much information on a floppy disc as can a
40-
track
drive.
Normally
40-track discs must be read by 40-track drives, and 80-track discs by
80-
track
drives. DDOS can also read 40-track discs on 80-track drives.
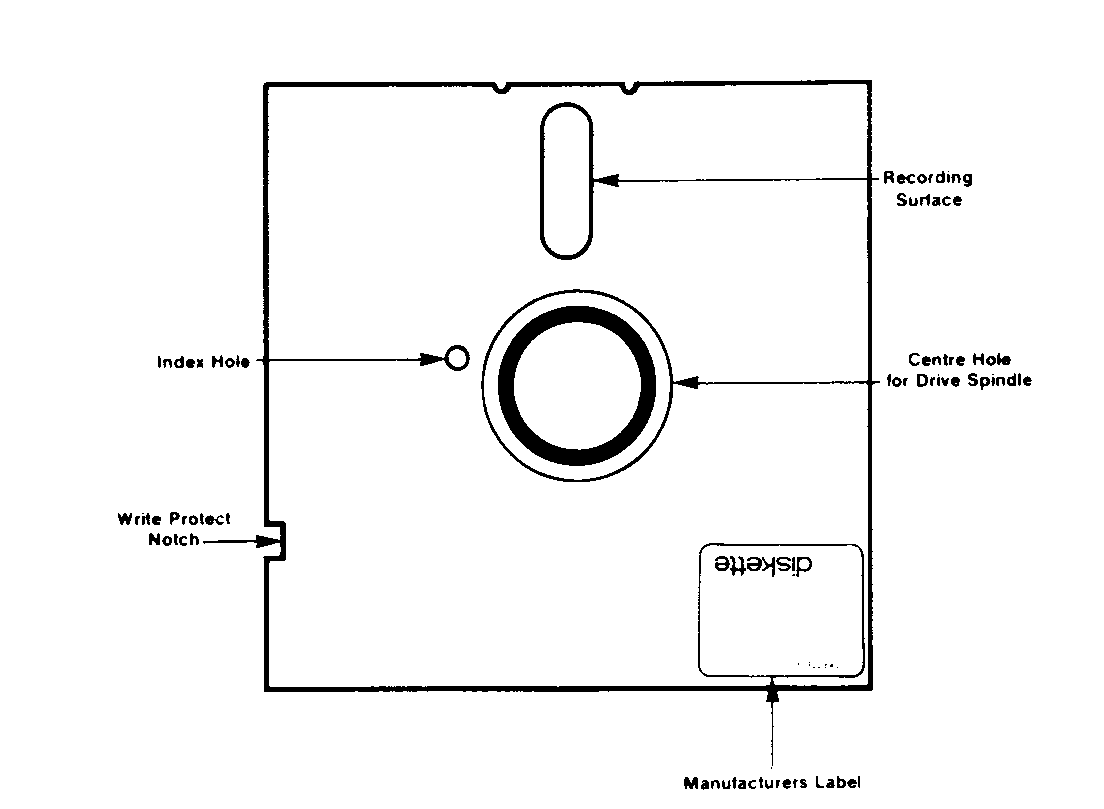
Floppy
Discs
You
will have purchased at least one box of blank floppy discs, so now is a
good
time
to study one, in conjunction with the diagram of the floppy
disc.
The
disc will be in a paper or cardboard protective envelope. Whenever a disc
is
not
being used, return it to its envelope, and then to a suitable storage box,
to
protect
it from dust. Dust can not only destroy a floppy disc and the information
on
it,
but it can wreck the disc drive as well.
When
removed from the envelope you will see three areas of exposed
magnetic
recording
surface; around the central hole, in a smaller offset hole called the
index
mark,
and an elongated radial hole called the head slot. Never touch any of
these
surfaces,
as the grease from your fingers may well ruin the disc.
Despite
their name, floppy discs are reasonably robust when handled with
care.
However,
they can easily be destroyed with heat (a carelessly placed coffee
cup),
by
strong magnetic fields (close to a television or monitor) or by physical
stress
(writing
onto the cover with a ball-point, for instance).
As
well as having to survive all these environmental hazards, the information
on
floppy
discs can quite easily be overwritten or deleted by human error. Because
of
this,
it is essential that you keep at least one copy of all discs which
hold
information.
4
Discs
come supplied with sticky identification labels. You should always
label
every
disc as soon as it has any useful information on it. Put as much
information
as
you need on the label to remind you what the disc holds. Indicate whether
the
disc
is a master or a copy. It is better to prepare the labels before sticking them
on
to
the disc; if you must write on a label which is already on the disc, use a
felt
tipped
pen with no great pressure.
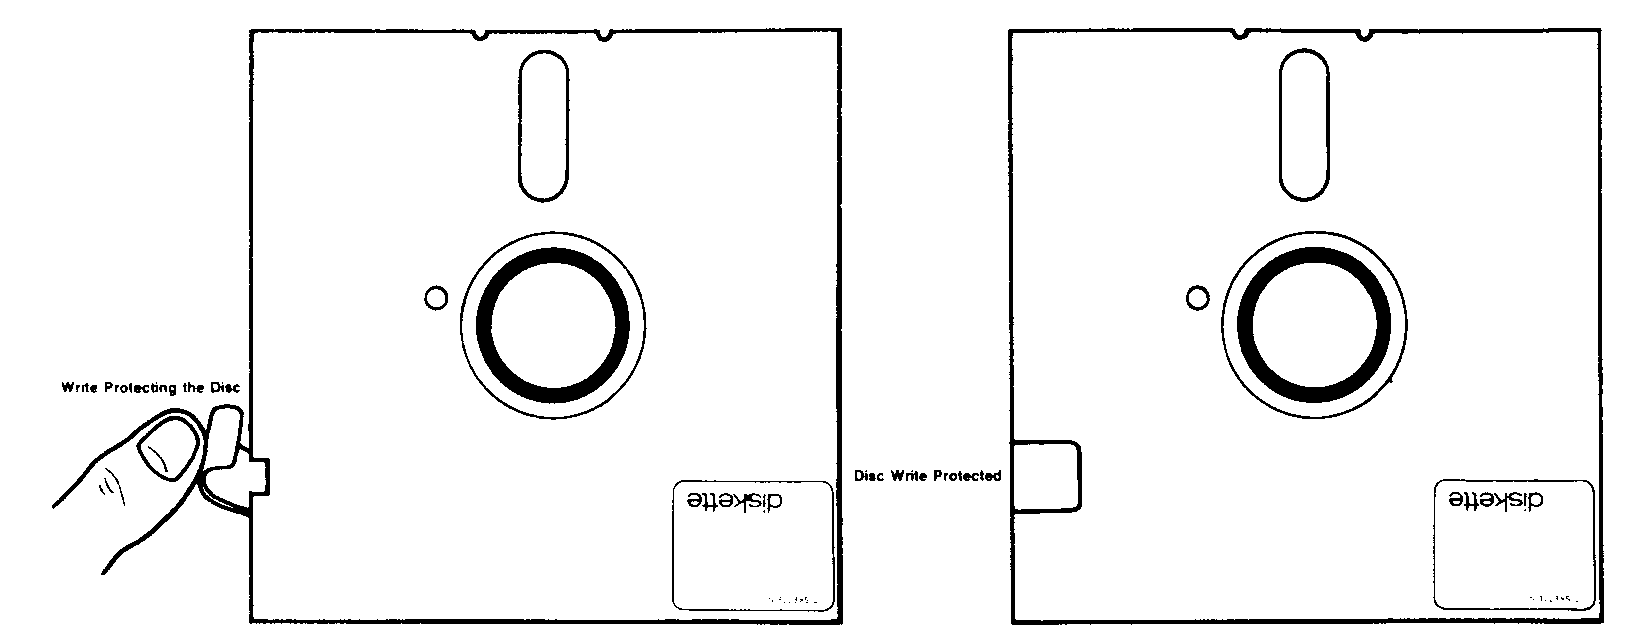
One
way of reducing the chance of accidental loss of information is to use
the
write-protect
tags which are supplied with the discs. They are sticky black
or
metallic
tags. If you completely cover the small write protection notch on the
side
of
a disc by one of these tags, a disc drive will be unable to alter the
information
on
the disc in any way, regardless of what you tell it to do.
It
should be noted here that floppy discs have as many varieties as do disc
drives.
Discs
are described in terms of the best performance that can be expected
from
them.
Thus the cheapest discs are described as 40-track (sometimes 48
tpi),
single-sided,
single density, and should not be used for double density
recording,
for
instance.
The
best discs cope with 80-track (96 tpi) and double density, and are
double
sided.
We would recommend that you always buy best quality double
density
discs,
specified for 80-track (96 tpi) if you have 80-track drives, and double sided
if
you
have double-sided drives. As floppy discs are relatively cheap, any
other
strategy
is false economy.
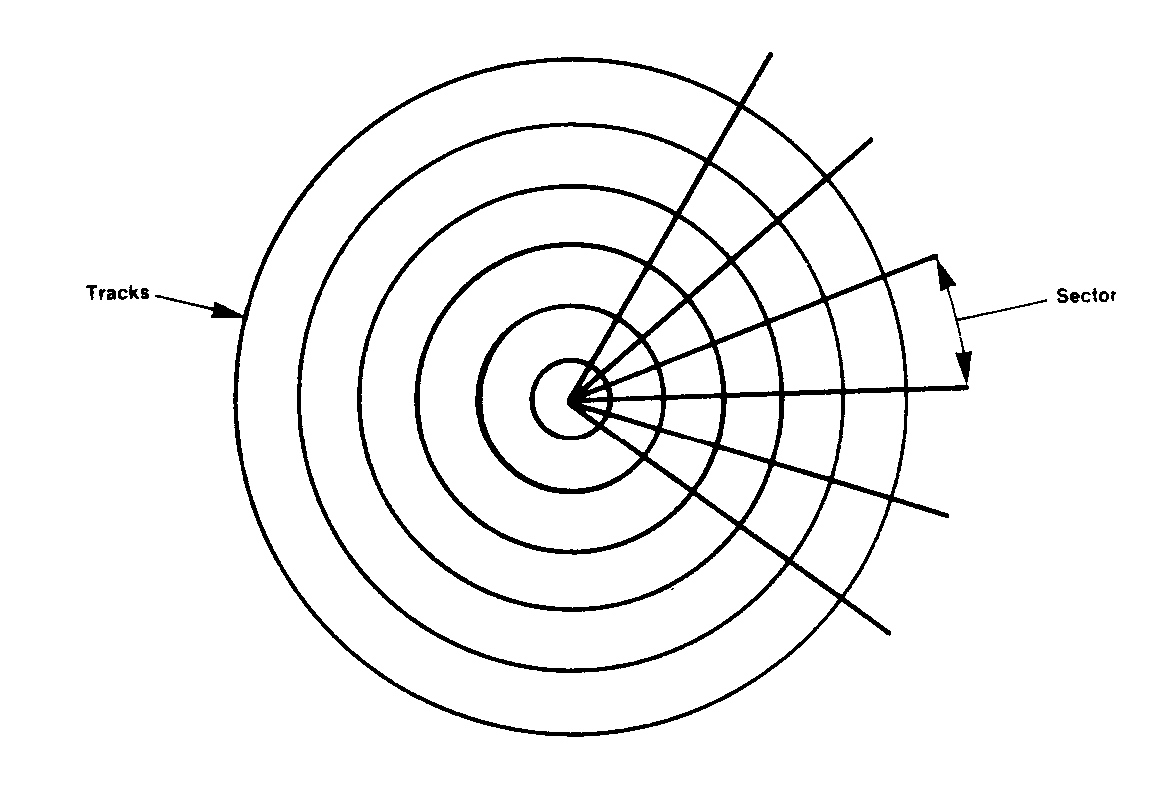
Disc
formats
A
brand new floppy disc is covered on one or both sides with a uniform coating
of
magnetic
recording material with no structure. Before such a disc can be of use
it
must
be given structure. It must be formatted.
When
formatted, a disc is divided into concentric rings called tracks. There are
49
or
89 tracks per side, depending on the disc drive.
Each
track is itself divided into sectors. Standard BBC single density discs
have
10
sectors per track. DDOS also offers double density format, in which each
track
has
18 sectors.
5
Each
sector contains 256 data bytes, plus some control information. Thus a
40-
track
disc recorded in single density will hold 40*10*256 = 1 OOK bytes of data
per
side,
similarly an 89 track disc recorded in double density will hold 80*18*256
=
360K
bytes of data per side.
As
well as the basic track/sector structure, each disc is divided into volumes.
A
volume
consists of a catalogue and one or more sectors available for
data
storage.
Standard
single density discs consist of a single volume, whereas DDOS
double
density
discs hold up to 8 volumes. Volumes have single letter names in
the
range
A to H.
3 Files
A
file is the basic unit of information storage in the filing system. Each volume
may
contain
up to 31 files.
A
file consists of data and a catalogue entry. The data is a collection of
bytes
stored
in consecutive sectors on a disc. Each data byte may take any
value
between
Q and 255.
The
catalogue entry is a collection of attributes of the file. These are the
entry
name,
the lock, the load address, the execution address, the byte length,
the
allocated
sector length, and the address of the first data sector.
6
The
entry name is the primary method of access to a file. lt is unique within
the
catalogue.
It consists of a single letter directory name, a fullstop, and a filename
of
up
to 7 characters. Neither the filename nor the directory name may contain
the
characters
. : # *. The filing system makes no distinction between upper and
lower
case
letters in entry names, or anywhere else for that matter.
In
Acorn DFS the full file specification includes not only the entry name, but
also
the
drive name, preceded by a colon and followed by a fullstop.
Thus
:
0. $ . FRED
specifies
the file named FRED of the directory $ on the disc in drive 0. In fact,
this
could
probably have been typed as
FRED
because
the filing system will substitute defaults for all the missing fields.
Initially
these
defaults are drive 0, directory $ but the user may change them with
the
*DRIVE
and *DIR commands, and the new defaults will be used until they are
set
again
by the user, or until a reset (BREAK).
In
DDOS the full file specification includes the entry name and the volume
and
drive
names. Thus
:
OA. $ . FRED
specifies
the file named FRED of the directory $ in volume A on the disc in drive
9.
The
default volume is initially volume A, and may be changed by the user with
the
*DRIVE
command.
Returning
to the catalogue attributes, the lock is an on-off switch. When the lock
is
on,
a file cannot be altered in any way; neither the data nor the catalogue entry
can
be
modified or destroyed. The file can still be read.
The
load and execution addresses are used by various file system
services
concerned
with manipulating whole files.
The
byte length of a file is the number of data bytes, which may be zero.
The
allocated
sector length of a file is the number of sectors set aside for the file
on
disc.
Normally it is just sufficient to store the data bytes, and it can be derived
from
the
byte length:
sector
length = (byte length + 255) MOD
256
The
address of the first data sector is used by the filing system to access the
data.
7
Opening
and Closing Files
There
are several file system services which are concerned with manipulating
a
file
as a single entity. However, when access to individual bytes is required, a
file
must
be accessed through a channel.
A
channel can be attached to a single file. the file has then been opened. To
close
a
file is to detach it from the channel.
Certain
additional attributes are associated with accessing a file through
a
channel.
These are the channel number, the write permit, the pointer and
the
buffer.
The
channel number identifies a particular channel. Acorn DFS and DDOS
make
five
channels available, numbered 17 to 21. Other filing systems, such as
the
cassette
filing system, use a different range of channel numbers.
The
write permit is an on-off switch. When the switch is on, data can be written
to,
and
read from the channel. When the switch is off, the channel can only be
read.
The
setting of the write permit is determined by the open mode. If the file
is
opened
for input, the write permit flag will be off. If a file is opened for output
or
update,
the write permit flag will be on.
More
than one channel can be attached to a given file, so long as they all
have
their
write permit switch off i.e. so long as they are all open for
input.
When
a file is to be opened for input or update, the file must already exist. When
a
file
is to be opened for output, a new file of zero length is created, replacing
any
existing
file.
When
a file is opened for update, or is opened for output and replaces an
existing
file,
the allocated sector length is initially set to that of the existing file. When
a file
opened
for output does not replace an existing file, the allocated sector
length
starts
at 64.
The
pointer is an index of an opened file's data bytes. When a file is opened,
the
pointer
for the channel is set to zero. The byte read or written to a channel is
the
byte
indexed by the pointer.
The
pointer is automatically incremented by one after each byte is read or
written.
The
user may also set the pointer explicitly.
If
the pointer is greater than or equal to the file length, an attempt to read a
byte will
fail
with an end-of-file (EOF) condition. If instead a byte is written to the file,
the byte
length
of the file is increased by one. If the file is
8
then
too long for the allocated sector length, the file is extended by adding to it
as
many
free sectors as possible. This will fail if the file has already reached the
end
of
the volume or the start of another file's data sectors.
The
buffer is a 256-byte area in memory in which is held a copy of the sector
from
which
the last byte was read, or to which the last byte was written. If the next
byte
to
be read or written is in the same sector, the filing system need not
actually
transfer
the sector to or from disc, but can use the buffer copy instead.
This
considerably
speeds up access to files.
Of
course, when a new sector is required, the filing system will have to flush
the
buffer
(that is, update the old sector to disc if it has been changed), and then
read
the
new sector into the buffer. The filing system will also have to flush the
buffer
when
the file is closed, and the user may explicitly flush a buffer at any
time.
Sequential
Access and Random Access
A
file is sequentially accessed when it is read or written from the first to the
last
byte
in order. Sequential file access does not require the explicit use of
the
pointer,
as the pointer is automatically incremented after each access.
Sequential
access
is the most efficient way to exploit the buffer.
Any
other mode of access is random access. The pointer is used to
explicitly
control
which byte is accessed. The data bytes may be accessed in any
order,
possibly
more than once or not at all. A random access file is similar to a
single
dimension
BASIC array, except that a random access file can be extended
beyond
its
original size.
Random
access is appropriate when the next byte to be accessed is
determined
by
the input from the keyboard. A typical random access program would be
the
implementation
of a spreadsheet.
Fast
as disc access is, badly-designed random access files can be
very
inefficient
to access. Thus in the spreadsheet example, if the file were divided
into
columns,
and then each column into rows, the program would run orders of
magnitude
slower than if the file were divided into rows and then columns. This
is
because
a spreadsheet will normally compute and display all the results for
a
given
row before moving onto the next.
File
Types
The
filing system does not distinguish- between sequential and random
access
files.
Indeed the same file can be accessed in both ways. More generally, the
filing
system
does not distinguish between the different uses made of files. It
considers
a
file to be a collection of data bytes, and some catalogue
attributes.
9
However,
a file is usually useful only if a particular interpretation is placed on
the
value
of its data bytes. The appropriate interpretation for a given file is known
as
the
file type, of which there are a few standards.
A
text file is a sequential file of printable characters and cursor movements
such
as
space, tab, backspace and newline in the ASCII character code.
Such
files are commonly known as 'ASCII files', but this is less accurate than
'text
files'
since the term 'ASCII' refers to a particular interpretation of ANY value in
the
range
9 to 127, which includes some characters which are not printable on
the
BBC
computer.
A
Basic program file is a sequential file of BASIC tokens and text that represents
a
Basic
program. Tokens are described in chapter 43 of the User Guide.
A
Basic data file is a sequential file of Basic data items (integers, reals,
and
strings)
generated using the PRINT# Basic statement. Such a file can be
read
using
the INPUT# Basic statement. A random access Basic data file also
requires
the
use of the PTR# Basic statement.
A
Binary program file is a sequential file of machine code instructions
and/or
binary
data that, when loaded into memory, forms a working machine
code
program,
or some part of one.
A
binary data file describes any file other than one of these defined types.
Its
interpretation
depends on the programs that access it. In Basic, a binary data
file
is
generated using the BPUT# statement and read using the 13GET# statement.
A
binary
data file can be interpreted sequentially or as a random access
file.
4 Getting
Started
Formatting
Before
you can store any information on a disc it is necessary to format your
new
discs.
With Acorn DFS the program for formatting a disc is not present in the
ROM
which
was installed in your BBC when the disc interface was fitted, and must
be
loaded
from disc. Opus DDOS and CHALLENGER both contain the formatting
program
in the ROM installed in your BBC with the disc interface. If you are
using
Acorn
DFS take your master utility disc which was supplied with your disc
drive,
and
ensure that it has a write protect label on it. If it does not have a write
protect
label
on it, put one on, you do not want to accidentally erase your only master
disc!
10
Insert
the master disc in drive Q, this is the top drive of a dual system. If your
disc
drive
is a 49-80 switchable, ensure the 40-80 switch is set to the 80 track
position.
Type
in the command:
*FORMAT
Press
the RETURN key at the end of the line. The disc drive will whirr and
the
indicator
light will come on. In a moment the formatting program will be
loaded
and
will ask you some questions. Remove the master disc at this
point.
If
you have Opus DDOS or CHALLENGER you do not need to insert a master
disc,
just
type the command as above.
The
formatting program will ask you which drive you wish to format the disc in,
use
drive
Q in this case, and how many tracks you wish to format. If you are using
an
80-track
drive select 89, if you are using a 40-track drive select 40. If you are
using
DDOS
or CHALLENGER you will also be asked which density you wish to
use,
select
single density in this case.
When
you have answered these questions insert a new disc in drive 0 and
when
the
formatting program says 'are you sure' answer 'y'. The formatting
program
asks
for this confirmation because when you format a disc all
previous
information
is erased.
Saving
and Loading BASIC programs
Whenever
a computer language is used on the BBC, it uses the current
filing
system
for saving and loading programs, and for all file handling. A BBC
which
does
not have a disc interface fitted uses the tape filing system to load and
save
programs.
When a disc interface is fitted the disc filing system is
automatically
made
the current filing system, and all the commands which were used with
the
tape
filing system can still be used,
11
but
now programs are loaded and stored to disc and files are opened to disc. It
is
not
necessary to change your programs provided that you have used file
names
which
are also legal disc file names.
Type
NEW to clear the BBC of any previous programs, and then type in
the
following
program.
10
CLS 20 PRINT
"Programs are quicker from disc"
30 END
Save
the program on your newly formatted disc, calling it ---FIRST-by placing
the
disc
in drive 0 and typing
SAVE
"FIRST"
The
indicator light on drive 0 will come on and the program will be saved
onto
disc.
You can now check that it is there by typing
*CAT
which
will show you the files on the disc. Remove the disc from your disc drive
and
switch
off the BBC; you should never switch your BBC off or on with discs in
the
disc
drive, or the discs can become corrupted. Switch the BBC back on and
insert
the
disc into the disc drive. To reload the program ---FIRST-type
LOAD
"FIRST"
You
may now type LIST to see that it has reloaded properly.
You
can see that the statements in BASIC for handling files on disc are the
same
as
those used with tape, with some extra commands allowed. The complete
list
of
BASIC statements, described in the BBC User Guide, which work with the
disc
filing
systems in the same way as with tape is:
BGET#,
BPUT#, CHAIN, CLOSE#, EOF#, INPUT#, LOAD, OPENIN, OPENOUT,
PRINT#,
SAVE
The
BASIC statement OPENUP is not described in earlier User guides, and is
not
available
with BASIC version 1. It has the same syntax as OPENIN, and
OPENOUT,
but the file is opened for update. OPENOUT performs the same
action
in
BASIC version 1.
The
EXT# and PTR# statements are described in the BBC User Guide, but are
not
available
with the tape system. EXT# returns the byte length of an open file.
PTR#
either
returns the pointer of an open file, or resets the
pointer
to a user specified value. The PTR# statement enables the BASIC
programmer
to use random access files.
Transferring
from tape to disc
If
you have had your BBC for some time you will have some programs stored
on
tape,
and will probably prefer to have these stored on disc. If these
are
commercial
programs which use machine code this is not always easy, and we
would
recommend you use one of the programs sold especially for doing this.
If
the
program which you wish to transfer is written in BASIC and is not too
large,
then
it will transfer to disc quite easily using the following
procedure.
Type
*TAPE
this
selects the tape filing system. Now load the program in the usual way, if
the
program
is the next one on the tape you may type
LOAD
" "
press
play on the tape recorder, and wait for the program to be loaded. When
it
has
loaded reselect the disc filing system by typing
*DISC
Acorn
DFS and Opus DDOS both require memory for their operation, and
lift
'PAGE'
from &0E00 to &1900. This reduces the memory available for
programs
and
will prevent those programs which use nearly all available memory,
and
those
which use machine code in fixed positions from working.
Using
Text Files
The
filing systems provide some simple utilities to manipulate text files. To
create
a
text file called, say,---NIIVIZO-from the keyboard, type
*BUILD
NIMZO
13
and
save the program to disc. Make sure that the name of the file is only
seven
characters
long. If you wished to call the program ---FRED-you would type
SAVE
"FRED"
and
the filing system will behave just as if the four OS commands had been
typed
in
at the keyboard.
There
is an even neater method of executing a sequence of commands. First
the
commands
need to be in a text file called $.!BOOT. There is no need to rebuild
the
file
- just change its name:
*RENAME
START !BOOT
Now
type the command
The
filing system will now prompt with a line number for each line of text to
be
entered
into the file :0.$.NIMZO. When you nave typed all the lines you want,
press
the
ESCAPE key to terminate the file creation. The screen might now
show:
To
check the contents of NIMZO, you can type
*LIST
NIMZO
to
display the text in NIMZO with line numbers, or
*TYPE
NIMZO
to
display the text without line numbers.
Notethat
*LIST and *TYPE are only suitable for text files. Another
command
*DUMP
should be used with non-text files. It displays not only the
printed
representation
of any text in a file, but also the hexadecimal coding of the
characters
therein.
If
you *LIST or *TYPE or *DUMP a long file, it is usually best to turn on the
BBC
page
mode first, by typing CTRL-N. If you want to stop listing before the end of
a
file,
just press ESCAPE at any time.
One
common use of text files is to encapsulate an oft-repeated sequence
of
commands,
which can then be executed using the *EXEC command. So for
example:
This
is a sequence of commands which you may always wish to execute
when
you
switch on the BBC. Now that they are captured in the text file START, you
can
execute
them all by typing
*EXEC
START
14
*OPT
4,3
This
sets the 'auto-start option' of the current default volume to be EXEC.
(For
discs
in single density format there is only one volume on each surface of
the
disc.)
What this means is that now, whenever you press SHIFT and BREAK
keys
together,
releasing the SHIFT key first, and the default volume is the same as
the
volume
written to above, and the current disc is in drive 0, then the file !BOOT
will
be
EXECed.
Text
files can also be used for manipulating BASIC program files. Chapter 37
of
the
BBC User Guide shows two ways of merging two BASIC programs. The
first
uses
the command *SPOOL, which sends all screen output to a file as well.
The
other,
rather confusingly, uses the *LOAD command, which loads files directly
into
memory.
Normally you should use the BASIC statement LOAD to load BASIC
program
files into memory.
Ambiguous
File Specifications
An
ambiguous file specification is the same as a normal, unambiguous,
file
specification,
with two extra possibilities.
The
character '#' can be used instead of the directory name, and/or instead of
one
or
more characters in the file name. It represents 'any
character'.
The
character '*' can be used instead of the directory name, and/or instead of
the
last
characters of the file name. It represents 'any sequence of
characters'.
So
the ambiguous file specification J### represents any file in the
default
directory
with a 4-character filename starting with 'J', and *JI* represents any file
in
the
default volume with a filename of 2 or more characters, starting with
'JI'.
Many
filing system commands accept ambiguous file specifications, and
the
interpretation
is always 'perform the command action for all the files which
match
the
specification'.
15
>*BUILD
NIMZO
1 Wherein
lies the beauty of 3 P-K5. ?
2 Why
is this move strong?
3 The
answer is as simple as it is astonishing.
4 The
move is strong because it is weak!
>*BUILD
START
1
-TV 0,1
2
-FX 6,0
3
*FX 12,3
4
-DIR 0
Displaying
Catalogues
The
*CAT command lists all the entry names in a volume catalogue, together
with
information
about the volume and the disc. It requires a volume to be
specified:
*
CAT
will
display the catalogue of the default volume, whereas
*CAT
2
will
display the catalogue of the default volume on drive 2.
The
*INFO command displays the byte length and the load and
execution
addresses
of all the files matching an ambiguous file specification.
Thus:
*INFO
* . *
lists
the attributes of all the files in the default volume.
Copying
Files
When
the file START was renamed to !BOOT above, only the catalogue entry
was
changed
to show the new name. To move the file to another volume or disc, or
to
make
a second copy of it, one of the filing system copying commands must
be
used.
All
the filing system copy commands will replace existing files of the same
name,
and
they all use memory as a buffer while copying files, so you will lose
the
current
program if you have not first SAVEd it.
The
*COPY command makes a copy of a file to a different volume (a different
drive
for
single density) with the same entry name. So:
*COPY
0 1
f.fred
creates
a file A f.fred on the lower drive from the file :0.f.fred on the upper
drive.The
command
syntax requires a source and target volume, and the entry name of
the
source
file which will be given to the target file.
If
the source and target drives are the same, *COPY assumes that the files
are on
different
physical discs, and alternately asks for the source and target discs to
be
loaded
into the drive. This is useful when you have only one drive and want to
copy
from
one disc to another.
A
powerful feature of *COPY is that it will copy more than one file at a time, if
an
ambiguous
file specification is given.
16
-COPY
1 0
##2
will
copy all files with the 3-character file names ending with '2' in the
default
directory
on drive 1 to the default volume on drive
0.
-COPY
0 2
-.
will
copy all files from the default volume on drive 0 to the default volume on
drive
2.
Earlier
the inherent vulnerability of data on floppy discs was pointed out. To
protect
your
valuable programs and data, you should take frequent copies of all
your
discs,
and keep copies well away from the masters and the computer.
The
simplest way to do this is to use *BACKUP, which makes an exact copy of
a
complete
disc. Thus
-BACKUP
0 1
copies
the disc in drive Q to that in drive 1. The target disc must already have
been
formatted
to the same density and number of tracks as the source disc, and
any
information
on it will be overwritten.
e,
you can still use *BACKUP:
With
only one driv
-BACKUP
0 0
directs
the user to alternately insert source and target discs, just like
*COPY.
Note
that *BACKUP uses all available memory as a buffer, and you will lose
your
current
program if you have not previously saved it. If you are performing
a
*BACKUP
on a single drive system, the number of times you will be asked
to
swap
the source and target discs will depend upon the amount of free
memory.
You
are advised to select screen mode 7, which provides the maximum
free
memory,
and hence the least number of disc swaps.
Deleting
Files
The
converse of copying files is deleting them. The *DELETE command
will
delete
a single file, providing its lock is not on (*ACCESS is used to
manipulate
file
locks).
*WIPE
and *DESTROY both accept an ambiguous file specification. *WIPE
asks
the
user if each matching unlocked file is to be deleted, whereas 'DESTROY
lists
all
the matches and asks the user if they should all be deleted or
not.
17
5 Commands
The
commands described in this section all relate to the manipulation of
discs
and
disc files, but they fall into three categories: operating system
commands,
filing
system commands and utility commands.
Operating
system (OS) commands are available on all BBC computers, and
under
any filing system. However, the interpretation of the command is
supported
by
the active filing system and therefore may vary depending on which
filing
system
is active. Thus the *CAT command is an operating system command
which
is interpreted somewhat differently by a disc filing system from the
tape
filing
system.
Filing
system (FS) commands are supported by the disc filing system, and
are
specific
to the disc operations performed by the disc filing system. They
are
unlikely
to be meaningful, or to be interpreted in the same way, when another
filing
system
is active. Thus *DESTROY is a disc filing system command which
is
meaningless
to the tape filing system.
Utility
commands are supported by the disc filing system, but will function
correctly
whatever
fillng system is active. Thus * LlST is a disc fillng system utility which
can
be
used to list the contents of a disc or a tape text file.
The
syntax of the commands is described in a similar style to that used in the
BBC
User
Guide (see p.199). Unlike BASIC, however, the disc filing systems do
not
distinguish
between upper-case and lower-case letters. Thus *DELETE fred
and
*delete
FRED are interpreted as the same.
All
commands are of the form:
*
<command> {<parameter>}
<command>
is from three to seven characters. Usually a command may be
abbreviated
to a leading substring followed by a full stop. How short the
substring
may
be will depend on what other commands might share the same
abbreviation.
Thus
*DRIVE can be abbreviated to *DRIV. or *DRI. or *DR., but not to *D.
which
would
be interpreted as *DISC.
For
filing system commands there is an additional complication in that
any
sideways
ROMs fitted to the BBC will be given the chance to service the
abbreviated
command before the filing system. Therefore, the shortest
abbreviation
given with each command may not be appropriate for your BBC.
Each
parameter must be preceded by at least one space, and should not
contain
embedded
spaces except within string contents. Some syntactic
18
items
that occur in the parameters of several commands are defined
here.
<drv>
<drvsp>
<sch>
<dir>
<dirsp>
<fi1e>
<entsp>
<fsp>
<asch>
<adir>
<afi1e>
<aentsp>
<afsp>
drive
name
drive
spec
spec
char
directory
name
directory
spec
fi1e
name
entry
spec
fi1e
spec
ambiguous
ambiguous
ambiguous
ambiguous
ambiguous
spec
char
dir
. name
fi1e
name
entry
spec
fi1e
spec
0
| 1 | 2 | 3
[
: ] [<drv>]
Any
character but
<sch>
<drvsp>
[<dir>]
{<sch>}x7
[<dir>.]<file>
<drvsp>
<entsp>
When
any part of a drive or directory spec is omitted, the corresponding
current
default
is substituted. Thus if the current default drive number is 1 ' and the
current
default
directory is $, then the file spec JOE specifies the file
A.$.JOE.
*ACCESS
<afsp> [L]
Abbreviation:
*A.
Type:
FS
If
the -L- is included, all files matching the ambiguous file spec are locked. If
the -L
is
omitted, all files matching the ambiguous file spec are
unlocked.
A
locked file cannot be deleted, overwritten, or written to until the file is
unlocked.
The
*CAT and *INFO commands display whether a file is locked or
not.
Example
>*ACCESS
A.TEST L
locks
the file A.TEST
>*ACCESS
$.*
19
<sch>
| #
<asch>
| *
{<asch>}x7
1 {<asch>}x6
[<adir>.]
<afile>
<drvsp>
<aentsp>