Before trying to insert an IC into a socket first check to see if the legs
of the IC are parallel with each other. If they appear crooked or splayed
apart then they should be re-aligned. To do this hold the IC sideways-on
and press it gently against a firm flat surface, repeat this for the other side
of the IC.
To insert an IC, hold the ends of the IC between thumb and forefinger and
line-up all the pins over the socket. Pin 1 should face to the WEST (or
left-hand side) of the pcb. note: all of the ICs on the pcb face in the
same direction.
Apply firm pressure to the IC, but do not force it into the socket. Check
that all the pins have entered the socket and that none of them are bent
either outwards or under the body of the IC.
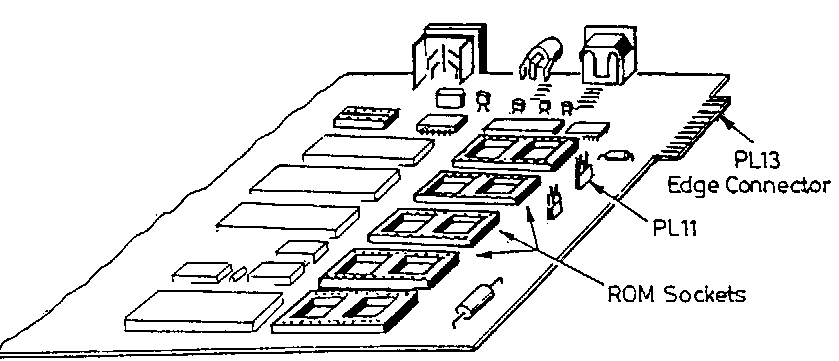
Referring to the diagram below and to silk screen markings on the pcb
insert the new ROM(s) as described above.
3. ROM operating priorities
ROM sockets have what is known as "Operating priorities". Essentially
this means that the ROM with the highest operating priority contains the
software (BASIC, PASCAL, VIEW etc.) that will be entered when the machine
is switched on or after a "hard reset" (CTRL BREAK) is performed. The
operating priority also governs which ROM will respond to a "*" command if
more than one is programmed to do so. The computer is supplied with BASIC
in the highest priority position and this will need to be changed if you
wish to default to another language. (How to do this is described below).
Each of the sockets is given a priority ranging from 0 to F (Hexadecimal),
where F is the highest priority and 0 is the lowest. The priority number
is actually known as the ROM's slot number. If you type:
*ROMS RETURN
the system slot numbers are displayed on the screen with the title of the
Software actually in the ROM(s). For example:
ROM F UTILS 01
ROM E BASIC 40
ROM D ACORN ADFS 01